
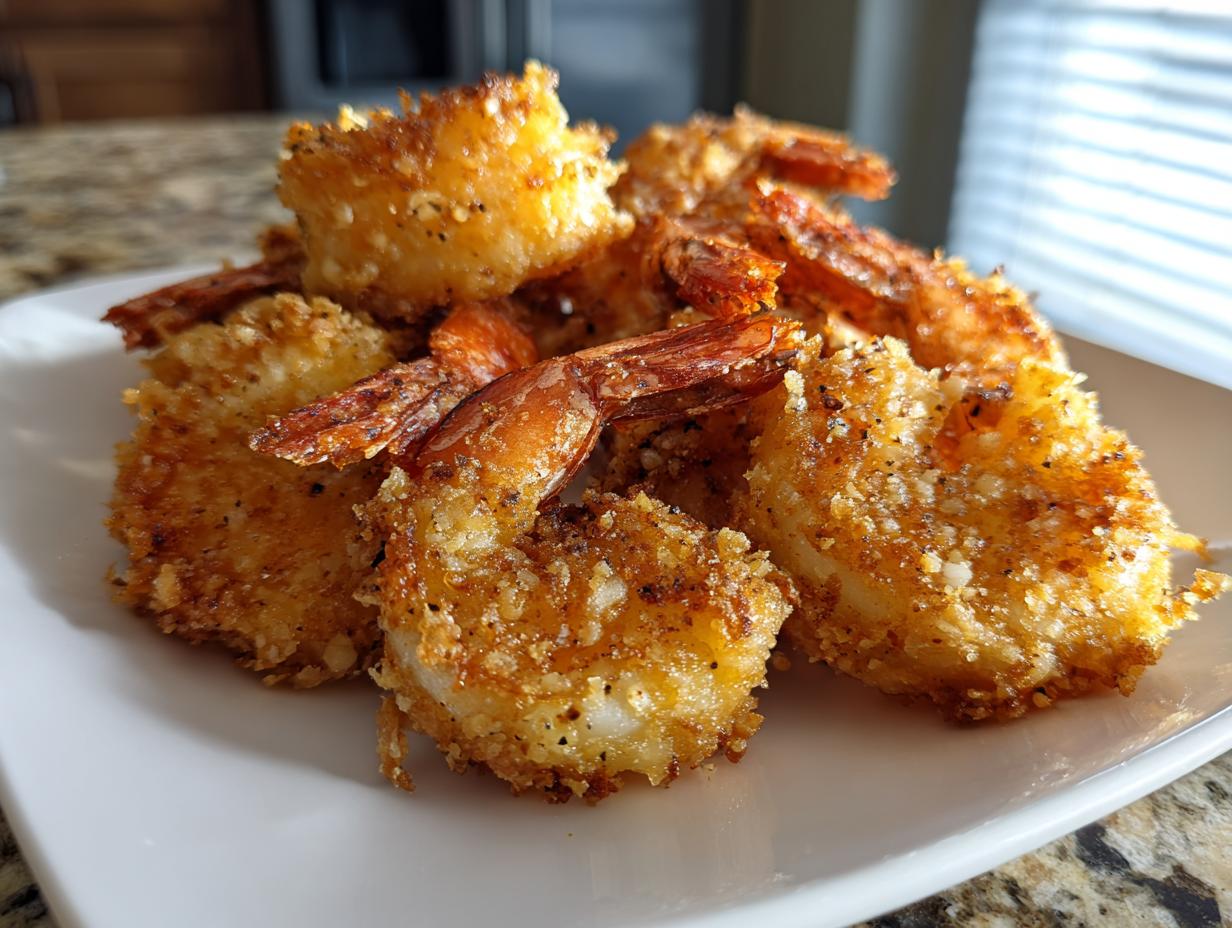
There’s just nothing like biting into truly perfect seafood, is there? You know, the kind that shatters when you touch it? If you’ve been hunting for that elusive, super crunchy bite, stop the search right here because I finally nailed the ultimate fried shrimp recipe. Forget soggy messes that taste like the oil they were cooked in! This is my version of Crispy Southern Fried Shrimp, perfected to be wonderfully crisp and absolutely never greasy.
When I started Mia’s Meals, I promised myself I would take those beloved comfort dishes—the ones that taste like celebration—and strip away the headache of complicated steps. This recipe is proof of that philosophy. It uses a simple buttermilk marinade and a few tricks that let you get that beautiful, restaurant-style finish right on your stovetop, even on a crazy Tuesday night.
- Why This Crispy Fried Shrimp Recipe Delivers Restaurant Style Results
- Ingredients for the Ultimate Crispy Fried Shrimp
- How to Prepare Perfect Fried Shrimp Step-by-Step
- Ingredient Notes and Simple Substitutions for Fried Shrimp
- Serving Suggestions for Your Homemade Fried Shrimp
- Storage and Reheating Instructions for Fried Shrimp
- Frequently Asked Questions About Making Fried Shrimp
- Estimated Nutritional Data for Fried Shrimp
- Share Your Perfect Fried Shrimp Experience
- Estimated Nutritional Data for Fried Shrimp
- Share Your Perfect Fried Shrimp Experience
Why This Crispy Fried Shrimp Recipe Delivers Restaurant Style Results
I’ve made a lot of seafood in my day, and what separates the good fried shrimp from the *amazing* kind really comes down to three things: marinade, dredge, and sheer temperature control. You can have all the fancy spices in the world, but if you skip the buttermilk soak, you’re missing out!
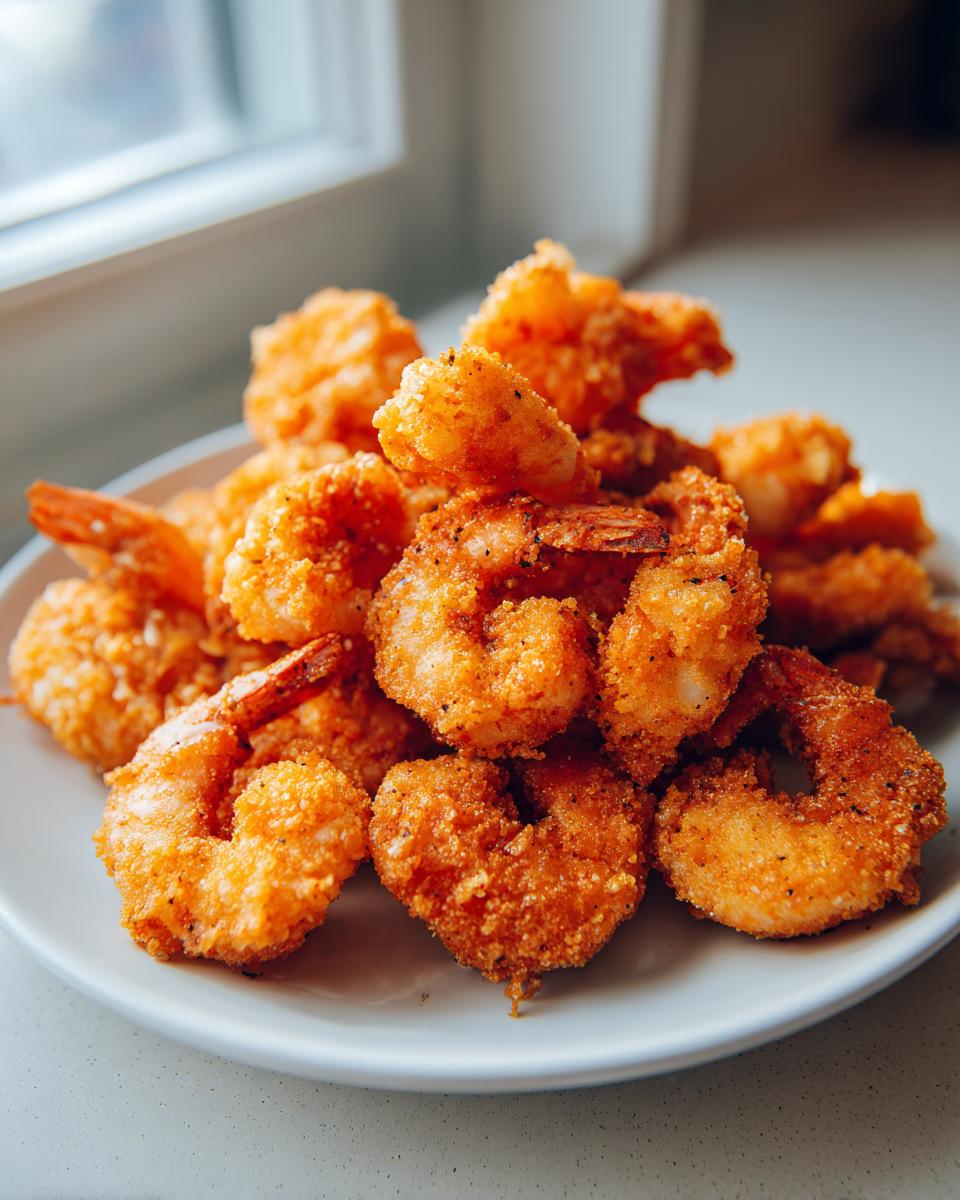
The buttermilk does something truly magical—it tenderizes the shrimp just enough, giving you that incredibly juicy interior. Then we hit it with the dredge mix, which includes cornstarch along with the flour. That cornstarch is the secret player in this Crispy Shrimp Recipe, helping create a shield against the oil. Trust me, this technique is what moves you toward that perfect Southern Fried Shrimp everybody hopes for.
If you’re looking specifically for the Best Fried Shrimp you’ve ever had at home, this method is it. I’ve seen so many people struggle with heavy textures, but we’re avoiding that heavy, greasy finish completely.
The Secret to Never Greasy Fried Shrimp
If your fried food swims in oil after it comes out of the pot, it means your oil temperature dropped too low. For this to be Never Greasy Fried Shrimp, you have to keep that oil locked in at exactly 365 degrees Fahrenheit. Seriously, grab a cheap thermometer; it’s worth it! After frying, pull the shrimp out and put them immediately onto a wire rack, not paper towels. That simple step lets air circulate all around so that glorious golden crust stays crisp right up until the moment you eat it.
Ingredients for the Ultimate Crispy Fried Shrimp
When you’re aiming for that Golden Fried Shrimp perfection, the measurements really matter. We aren’t just throwing things together here; we’re building layers of flavor and texture. I’ve listed everything out below just like it’s written on my personal card. Don’t try to eyeball these amounts, especially when it comes to that dredging mix!
The shrimp size is key, too. I always recommend using extra large shrimp, and make sure you leave the tail on. It gives you a perfect little handle for dipping, which is just practical and fun!
- 2 pounds extra large shrimp, peeled and deveined, tail on
- 2 large eggs
- 1/2 cup buttermilk
- 1 tablespoon hot sauce (optional—but I highly recommend it for a little background kick!)
- 1 cup all-purpose flour
- 1/2 cup cornstarch (this is mandatory for that crisp factor!)
- 1 teaspoon salt
- 1 teaspoon black pepper
- 1 teaspoon garlic powder
- 1 teaspoon smoked paprika
- 1/2 teaspoon cayenne pepper
- Peanut oil or vegetable oil, for frying (you’ll need enough to cover the shrimp by about two inches)
How to Prepare Perfect Fried Shrimp Step-by-Step
Okay, this is where we roll up our sleeves and learn exactly How to Fry Shrimp Perfectly. It looks like deep frying can be intimidating, but trust me, once you get the system down, you’ll be throwing dinner on the table in minutes. We need three bowls ready: one for the wet marinade, one for the dry dredge, and then your pot of hot oil standing by.
Remember, the secret to that amazing, craggy crust is how you treat the surface of that shrimp during these steps. We don’t want them just lightly dusted; we want that coating to really adhere before it hits the heat! This whole process is streamlined, just like how I try to keep things simple for a quick seafood dinner.
Marinating the Shrimp for Flavor
First thing first is getting those beauties swimming in the buttermilk mixture. Whisk those eggs, buttermilk, and optional hot sauce together in a bowl. Toss in all your shrimp so they are totally coated. I let mine hang out in the fridge for at least 30 minutes. If you have the time, up to two hours makes them super tender, but don’t forget them for too long, or the buttermilk can start to work too much magic!
Creating the Seasoned Dredge for Your Fried Shrimp
While the shrimp chills, we make the seasoning party mix! Combine your flour and cornstarch with all those wonderful spices we listed. This combination is exactly what gives you that beautiful crunch barrier—that’s the key to that Southern Fried Shrimp texture you want. Make sure you whisk it really well so the cornstarch doesn’t settle at the bottom; we want that flavor evenly distributed through every grain of flour. That cornstarch is what makes the difference between a soft coating and a truly crispy one!

Frying Technique for Golden Fried Shrimp
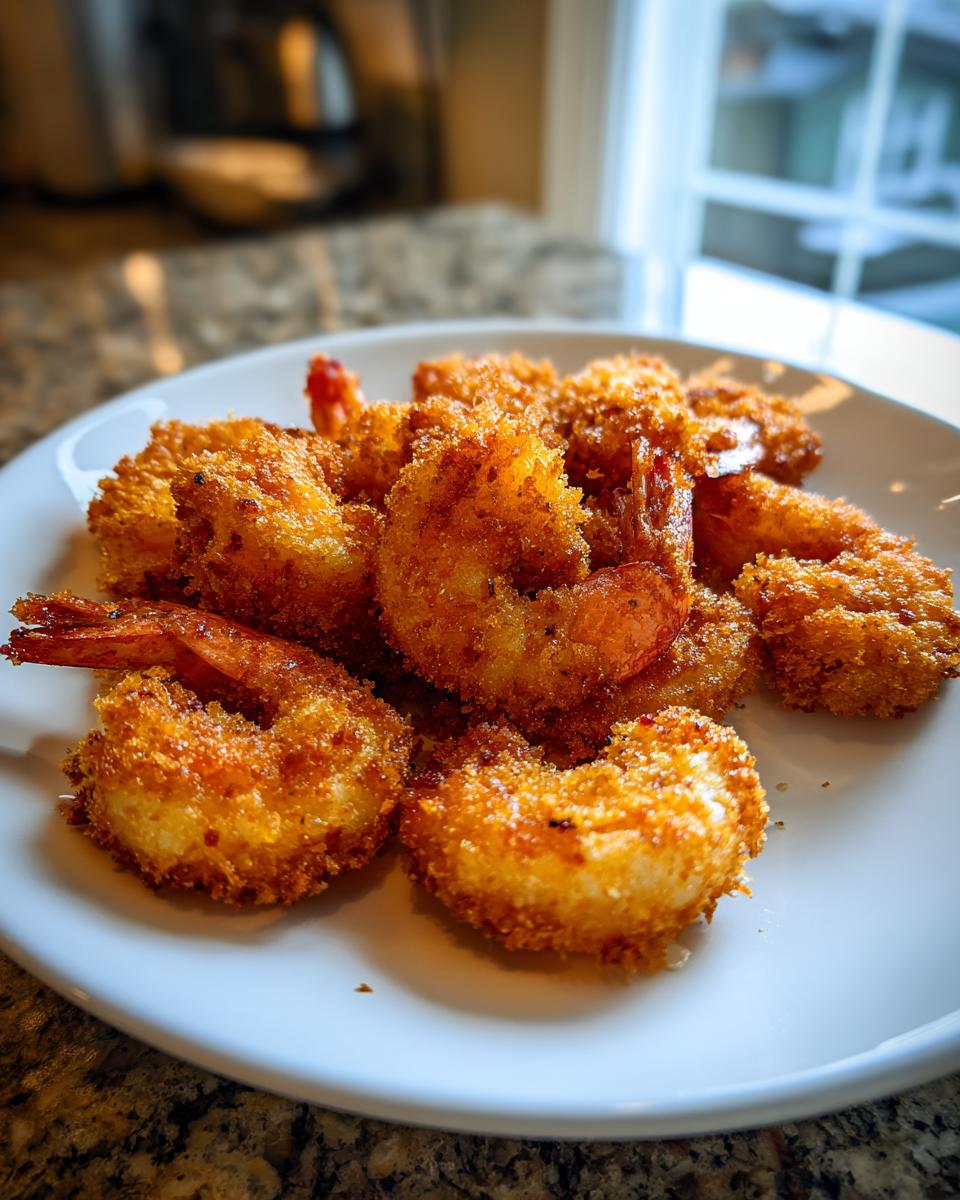
Get your oil heated up to a steady 365 degrees Fahrenheit. This temperature is non-negotiable for beautiful, non-greasy results. Now, here is a tip I learned wrestling with my mama’s huge cast-iron skillet: you absolutely cannot overcrowd the pot. When I put too many in at once, the oil temperature crashes instantly, and all that moisture steams the coating instead of frying it. It’s a rookie mistake! Work in small batches, frying for just 2 to 3 minutes per side until they look perfectly golden brown, checking your oil thermometer often. This careful attention guarantees your shrimp come out golden!
Ingredient Notes and Simple Substitutions for Fried Shrimp
I know sometimes you open the pantry and realize you’re missing one crucial thing. Don’t panic! My whole kitchen philosophy here at Mia’s Meals is about making something delicious happen even when life throws you a curveball. Let’s talk about some ingredient choices for this Buttermilk Fried Shrimp recipe and what you can swap out if you need to.
First, let’s talk oil. I specify peanut oil because it has an incredibly high smoke point, which helps maintain that vital 365°F temperature we talked about. Vegetable oil is a wonderful, more neutral second choice, and it works just fine for this Seafood Fry Recipe. Just monitor that temperature like a hawk!
What if you don’t have buttermilk? That’s easy to fix! You can make a quick version at home, which I often do when I’m making a spontaneous batch. Just take regular milk—any kind will do—and stir in about a tablespoon of white vinegar or lemon juice for every cup of milk you use. Let it sit on the counter for five minutes until it starts to look just a little curdled. That’s your buttermilk replacement, and it works perfectly for marinating those shrimp!
If you’re out of smoked paprika or cayenne, don’t stress about the spice too much. You can lean harder on garlic powder or even use whatever Creole seasoning blend you have on hand. The core goal of the marinade is tenderization first, seasoning second. But if you can find those spices, they really give you that authentic depth you find in true Southern Fried Shrimp. Check out some great spice combos over at this fellow cook’s site if you want to get creative, but stick to the listed base amounts for your first perfect batch!
Serving Suggestions for Your Homemade Fried Shrimp
Whew! Once you’ve pulled that last perfect batch of shrimp out of the oil, the hard part is over. But what do you serve with this gorgeous Homemade Fried Shrimp? These golden beauties are fantastic all by themselves, maybe just with a wedge of lemon, but I really love turning them into a full, satisfying meal or a show-stopping appetizer. They are so quick that they fit right into my ideas for Simple Shrimp Dinner Ideas!
Honestly, the best thing to serve alongside is something sturdy that soaks up any leftover flavor, like creamy mashed potatoes or maybe even my famous Twice Baked Potatoes—they are cheesy, bacon-y, and they compliment fried food perfectly. But everyone really cares about the sauce, don’t they? When I make this for dinner, I almost always make a batch of cocktail sauce on the side. It’s much better than anything from a jar, and it takes ninety seconds!
Quick Recipe for Shrimp Dipping Sauces
This is just the basic, zesty formula that the notes in the recipe mentioned. You just need to mix these things up and put them in a little ramekin. That little bit of horseradish cuts right through the richness of the fried coating, balancing everything out beautifully. This is perfect for dipping, and it makes serving feel much more elevated than just grabbing a squeeze bottle!
- Start with about 1 cup of your favorite ketchup.
- Add 1 to 2 tablespoons of prepared horseradish—use more if you like heat!
- Stir in a sneaky dash of Worcestershire sauce for depth.
- Finally, squeeze in the juice from half a fresh lemon.
Give it a good whisk until it’s smooth. That’s it! If you’re feeling fancy and want a tartar sauce instead, just mix mayonnaise with finely chopped pickles, capers, and a little extra lemon juice. Either way, having that cool, tangy sauce ready when your Fried Shrimp comes piping hot off the rack is the final secret to a great seafood night. You can even check out how other cooks are enjoying their shrimp over at this post for more sauce inspiration!
Storage and Reheating Instructions for Fried Shrimp
So, you managed to have leftovers? That’s rare in my house because this Fried Shrimp disappears so fast, but if you do, we absolutely must talk about storage. You cannot, under any circumstances, just leave these beauties in a plastic container on the counter or—heaven forbid—leave them uncovered in the fridge. The enemy of crispness is trapped moisture, and that’s exactly what happens when you seal up hot food!
If you want to save them for lunchtime tomorrow, let the shrimp cool completely to room temperature first. Then, spread them out in a single layer on a plate lined with paper towels, and then loosely cover them with another paper towel. Don’t seal the container! This lets the exterior dry out slightly while protecting them from fridge odors. They should last a day or so this way.
Now, the reheating part is where most people mess up their perfectly seasoned coatings. Forget the microwave! Microwaving turns everything soft and floppy, and it’s just sad. For the absolute best texture—getting back that crispy, almost Restaurant Style Fried Shrimp crunch—you need dry heat.
I highly recommend using a toaster oven or your regular oven set to about 375 degrees Fahrenheit. Spread the shrimp out on a wire rack set over a baking sheet. Yes, a rack! This gets air underneath them so the bottom doesn’t get soggy while the top crisps up. It only takes about 8 to 10 minutes, but keep an eye on them. They’ll come back to life beautifully, looking almost as good as when they first came out of the fryer. If you’re looking for the secrets to lasting crispness, I found a great post about the science behind it over at Cheff Recipes!

If you have an air fryer, even better! That’s the quickest route back to glory. 370 degrees for maybe 4 or 5 minutes should do the trick while keeping that lovely coating intact.
Frequently Asked Questions About Making Fried Shrimp
I totally get it; whenever I try a new technique, I have a hundred questions floating around in my head, too. People always ask me about avoiding the grease or how to streamline this for a busy night. Here are the things I hear most often about getting that fantastic Restaurant Style Fried Shrimp at home.
Can I bake or air fry these shrimp instead of deep frying?
This is truly the number one question! If you’re trying to make this an Easy Seafood Dinner without the oil, you certainly can bake or air fry them, but you need to adjust your expectations slightly. The deep-fried texture—that perfect, craggy crunch—just won’t happen the same way in an oven. If you bake them (around 400 degrees until cooked through), they will be crispier than standard breaded shrimp, but they won’t have that shattered crust finish that comes from the hot oil.
For the air fryer, definitely use a light spray of oil on the coated shrimp before you place them in the basket. Air fry at 380 degrees for about 8 minutes, shaking halfway through. It’s a great, less messy option, but for the absolute best crunch, deep frying is the way to go!
What is the absolute single best oil to use for frying shrimp?
As I mentioned earlier, the oil is doing heavy lifting here because it has to hold a high, stable temperature. I am devoted to peanut oil because it handles heat like a champ and imparts almost no flavor. Vegetable oil is my second favorite because it’s easy to find and relatively neutral. Whatever you choose, make sure you have a thermometer, because keeping it right around 365 degrees is the core of preventing sogginess. If you want to dive deeper into selecting cooking oils, I found a great chart over at Recipe & Flavor that breaks down smoke points!
I have great shrimp, but the coating keeps falling off in the oil. What am I doing wrong?
Oh, I’ve been there, staring at a pot full of sad, naked shrimp! This is where the buttermilk marinade really helps, as it creates a sticky base for the dredge to grab onto. But beyond that, you need to be firm but gentle when coating. Make sure you press that seasoned flour mixture onto the shrimp! Don’t just sprinkle it over the top; use your fingers to gently pat the coating onto the whole shrimp. Also, shake off the extreme excess before it goes into the oil. Too much loose coating burns quickly, which makes the oil dirty faster and can interfere with the shrimp coating adhering properly to the shrimp itself.
Can I use frozen shrimp for this recipe?
You absolutely can, but you must thaw them completely first. Do not put frozen shrimp into hot oil; it will instantly drop your temperature and result in soggy, raw-in-the-middle seafood. Thaw them slowly in the refrigerator overnight, or if you’re in a rush, place them in a colander submerged in cold water for about 20 minutes, changing the water halfway through. They must be fully thawed and patted very, very dry before they ever meet that buttermilk bath!
If you are looking for other fast-food favorites made simple, check out my ideas for quick weeknight dinners; sometimes we need something fast that isn’t seafood!
Estimated Nutritional Data for Fried Shrimp
Now, folks, this is my favorite part of sharing these recipes—being completely transparent about what we are eating. Since this is deep-fried, it is certainly a treat, not an everyday meal, but you can see we still get a fantastic amount of protein in every serving!
Keep in mind these numbers are estimates for one serving (about 6 ounces) based on the specific ingredients listed above, especially the type of oil used. I always say leftovers are best reheated in the oven, and if you use a rack during reheating, you might blot off a tiny bit of residual fat, skewing the numbers slightly lower!
- Serving Size: 6 oz
- Calories: 450
- Fat: 25g (Mostly unsaturated fats from the oil!)
- Saturated Fat: 5g
- Protein: 30g
- Carbohydrates: 30g
- Sodium: 650mg (Seasoning is friendly, but salt adds up!)
- Sugar: 2g
Share Your Perfect Fried Shrimp Experience
I truly hope this recipe brings some delicious, crispy joy to your dinner table! I put a lot of love into figuring out the best way to make these at home without needing a backyard fryer setup, and I’m so proud of how these turn out. If you followed along and loved that crunch, please give this recipe a 5-star rating right below the instructions!
It means the world to me when I hear from you. If you made it your own—maybe you swapped out the cayenne for smoked salt or tried a completely different sauce? I want to know! Tag me in your photos if you post them on social media. I always love seeing how you are building happiness around the dinner table. If you have ideas for something you’d like me to simplify next, let me know over on my contact page! And for more wonderful inspiration, check out the amazing food images captured by Lazy Meal Prep—they always find the right angle!
Estimated Nutritional Data for Fried Shrimp
Now, folks, this is my favorite part of sharing these recipes—being completely transparent about what we are eating. Since this is deep-fried, it is certainly a treat, not an everyday meal, but you can see we still get a fantastic amount of protein in every serving!
Keep in mind these numbers are estimates for one serving (about 6 ounces) based on the specific ingredients listed above, especially the type of oil used. I always say leftovers are best reheated in the oven, and if you use a rack during reheating, you might blot off a tiny bit of residual fat, skewing the numbers slightly lower!
- Serving Size: 6 oz
- Calories: 450
- Fat: 25g (Mostly unsaturated fats from the oil!)
- Saturated Fat: 5g
- Protein: 30g
- Carbohydrates: 30g
- Sodium: 650mg (Seasoning is friendly, but salt adds up!)
- Sugar: 2g
Share Your Perfect Fried Shrimp Experience
I truly hope this recipe brings some delicious, crispy joy to your dinner table! I put a lot of love into figuring out the best way to make these at home without needing a backyard fryer setup, and I’m so proud of how these turn out. If you followed along and loved that crunch, please give this recipe a 5-star rating right below the instructions!
It means the world to me when I hear from you. If you made it your own—maybe you swapped out the cayenne for smoked salt or tried a completely different sauce? I want to know! Tag me in your photos if you post them on social media; I always love seeing how you are building happiness around the dinner table. If you have ideas for something you’d like me to simplify next, let me know over on my contact page! And for more wonderful inspiration, check out the amazing food images captured by Lazy Meal Prep—they always find the right angle!
PrintThe Ultimate Crispy Southern Fried Shrimp
Make perfectly crispy, never greasy fried shrimp using a simple buttermilk marinade and seasoned flour dredge. This recipe delivers restaurant-style flavor quickly.
- Prep Time: 20 min
- Cook Time: 10 min
- Total Time: 50 min
- Yield: 4 servings 1x
- Category: Dinner
- Method: Deep Frying
- Cuisine: American
- Diet: Low Lactose
Ingredients
- 2 pounds extra large shrimp, peeled and deveined, tail on
- 2 large eggs
- 1/2 cup buttermilk
- 1 tablespoon hot sauce (optional)
- 1 cup all-purpose flour
- 1/2 cup cornstarch
- 1 teaspoon salt
- 1 teaspoon black pepper
- 1 teaspoon garlic powder
- 1 teaspoon smoked paprika
- 1/2 teaspoon cayenne pepper
- Peanut oil or vegetable oil, for frying
Instructions
- In a medium bowl, whisk together the eggs, buttermilk, and hot sauce if you are using it. Add the shrimp and toss to coat completely. Let the shrimp marinate in the refrigerator for at least 30 minutes, or up to 2 hours.
- In a shallow dish, whisk together the flour, cornstarch, salt, pepper, garlic powder, paprika, and cayenne pepper. This is your seasoned dredge.
- Pour enough oil into a deep, heavy-bottomed pot or deep fryer to reach a depth of about 2 inches. Heat the oil to 365 degrees Fahrenheit (185 degrees Celsius). Use a thermometer to monitor the temperature; maintaining this heat is key to crispy shrimp.
- Working in batches, remove the shrimp from the buttermilk mixture, allowing excess to drip off. Dredge each shrimp thoroughly in the flour mixture, pressing the coating onto the shrimp to make sure it adheres well. Shake off any loose flour.
- Carefully place the coated shrimp into the hot oil, ensuring you do not overcrowd the pot. Fry for 2 to 3 minutes per side, turning once, until the coating is golden brown and crisp.
- Use a slotted spoon or spider to remove the fried shrimp from the oil. Place them on a wire rack set over a baking sheet to drain excess oil. This prevents the bottom from steaming and losing crispness.
- Repeat with the remaining shrimp, allowing the oil temperature to return to 365 degrees Fahrenheit between batches.
- Serve immediately with lemon wedges or your favorite dipping sauce.
Notes
- For extra crispiness, you can double-dip the shrimp: dredge once, briefly dip back into the buttermilk, and then dredge again in the flour mixture.
- Do not let the oil temperature drop below 350 degrees Fahrenheit, or the shrimp will absorb too much oil and become greasy.
- If you prefer cocktail sauce, mix ketchup, horseradish, Worcestershire sauce, and a squeeze of lemon juice.
Nutrition
- Serving Size: 6 oz
- Calories: 450
- Sugar: 2
- Sodium: 650
- Fat: 25
- Saturated Fat: 5
- Unsaturated Fat: 20
- Trans Fat: 0
- Carbohydrates: 30
- Fiber: 1
- Protein: 30
- Cholesterol: 250