
Oh, the holidays! Does anything bring back a rush of childhood memories faster than finding those little, perfectly shaped Christmas Tree Cakes in the snack aisle? I know for me, that coconut and vanilla smell just takes me right back to my grandmother’s kitchen in Ohio. But let’s be real, trying to bake everything from scratch during this super busy time just isn’t always practical. That’s why my mission here at Mia’s Meals is to take something nostalgic and comforting and simplify it without losing any of the magic. This year, we’re merging that sweet memory with my favorite creamy indulgence: the ultimate Christmas Tree Cheesecake. Trust me, embedding those iconic Little Debbie cakes right into the filling is the easiest way to serve up pure holiday joy!
- Why This Christmas Tree Cheesecake Recipe is Your New Holiday Favorite
- Gathering Ingredients for Your Christmas Tree Cheesecake
- Step-by-Step Instructions for the Christmas Tree Cheesecake
- Transforming Your Cheesecake into Festive Party Treats
- Ingredient Notes and No Bake Christmas Dessert Variation
- Storage and Reheating Instructions for This Holiday Cheesecake Idea
- Frequently Asked Questions About Cheesecake with Candy Cakes
- Estimated Nutritional Snapshot
- Share Your Holiday Baking Creations
Why This Christmas Tree Cheesecake Recipe is Your New Holiday Favorite
When you see this beauty sitting on your dessert table, people will immediately know you went the extra mile! But here is the secret: it’s genuinely simple. We’re taking a classic, creamy baked cheesecake and giving it the ultimate glow-up with zero extra effort.
- It hits that perfect nostalgic sweet spot that brings smiles to everyone’s faces during the holidays.
- It delivers that incredibly smooth, rich texture we all love in a top-tier cheesecake.
- It looks stunningly festive without requiring complicated piping or hours of decorating.
- Compared to baking a full cake or making dough from scratch, this is totally manageable for a busy season!
Nostalgic Flavor Meets Creamy Perfection
We aren’t just making any dessert; we are making Nostalgic Holiday Desserts that taste like childhood! That hidden layer of Little Debbie Christmas Tree Cake provides pockets of sweet, slightly coconut-flavored goodness. It fuses that fun, store-bought treat flavor right into the sophisticated, velvety texture of a homemade, creamy holiday cheesecake. It’s unexpected and absolutely delicious.
Tips for Easy Christmas Baking Success
To ensure you get that picture-perfect, crack-free top—which is crucial for presentation—I always stand by the oven timing. For this recipe, the cooling process is just as important as the baking! Remember, part of making this *Easy Christmas Baking* is letting the oven do the slow cooling work for you. Follow that step carefully, and you are golden!
Gathering Ingredients for Your Christmas Tree Cheesecake
Okay, let’s talk shopping! You can’t make this amazing Christmas Tree Cheesecake without the right components. Now, Mia’s Meals is all about making things easy, but when it comes to cheesecake, there’s one thing you absolutely cannot rush, and that’s softening your cream cheese. If it’s even a tiny bit cold when you mix it, you are going to get lumps, and trust me, nobody wants a lumpy, bumpy holiday treat! Make sure that cream cheese is sitting out on the counter for at least an hour before you even think about turning on that mixer.
Crust Components and Cream Cheese Clarity
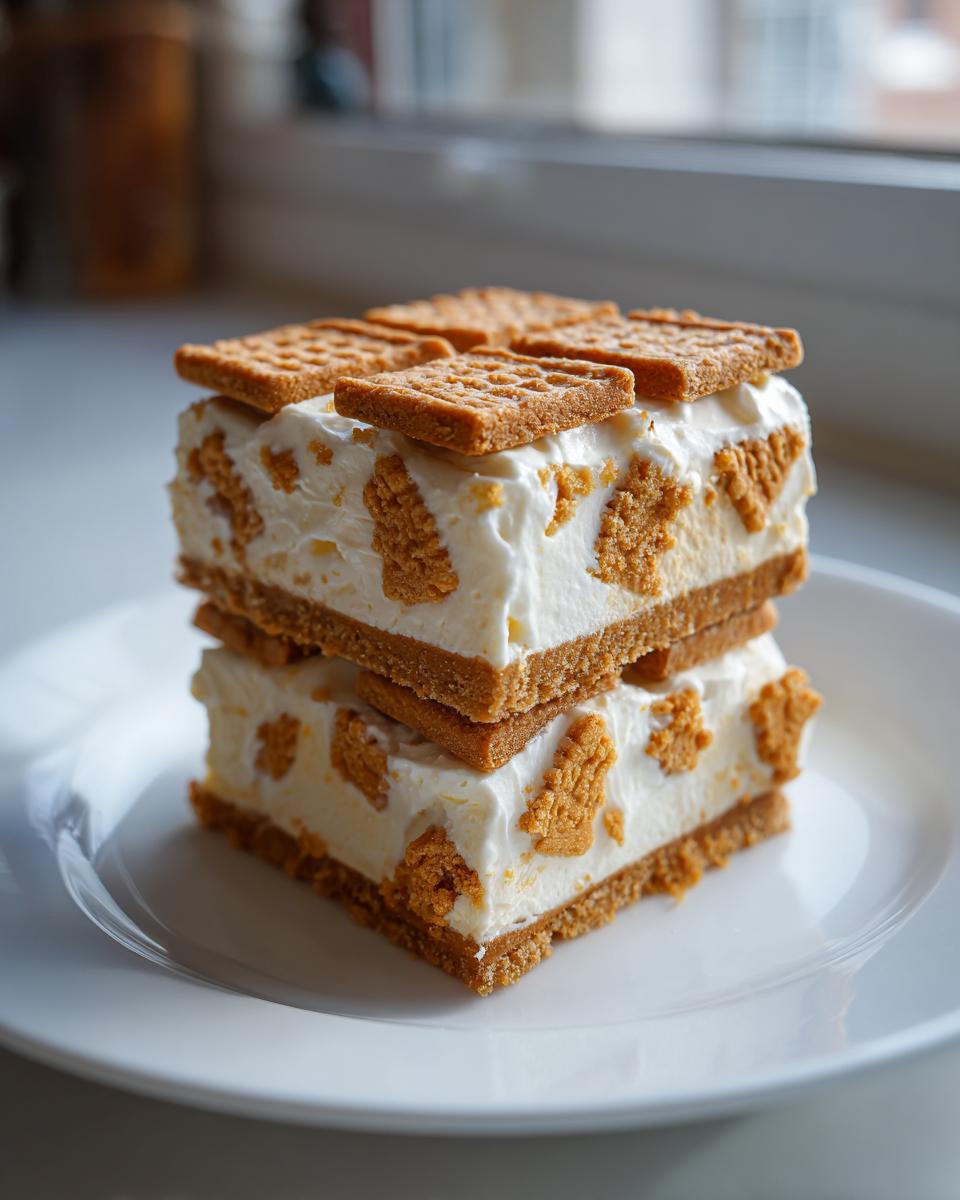
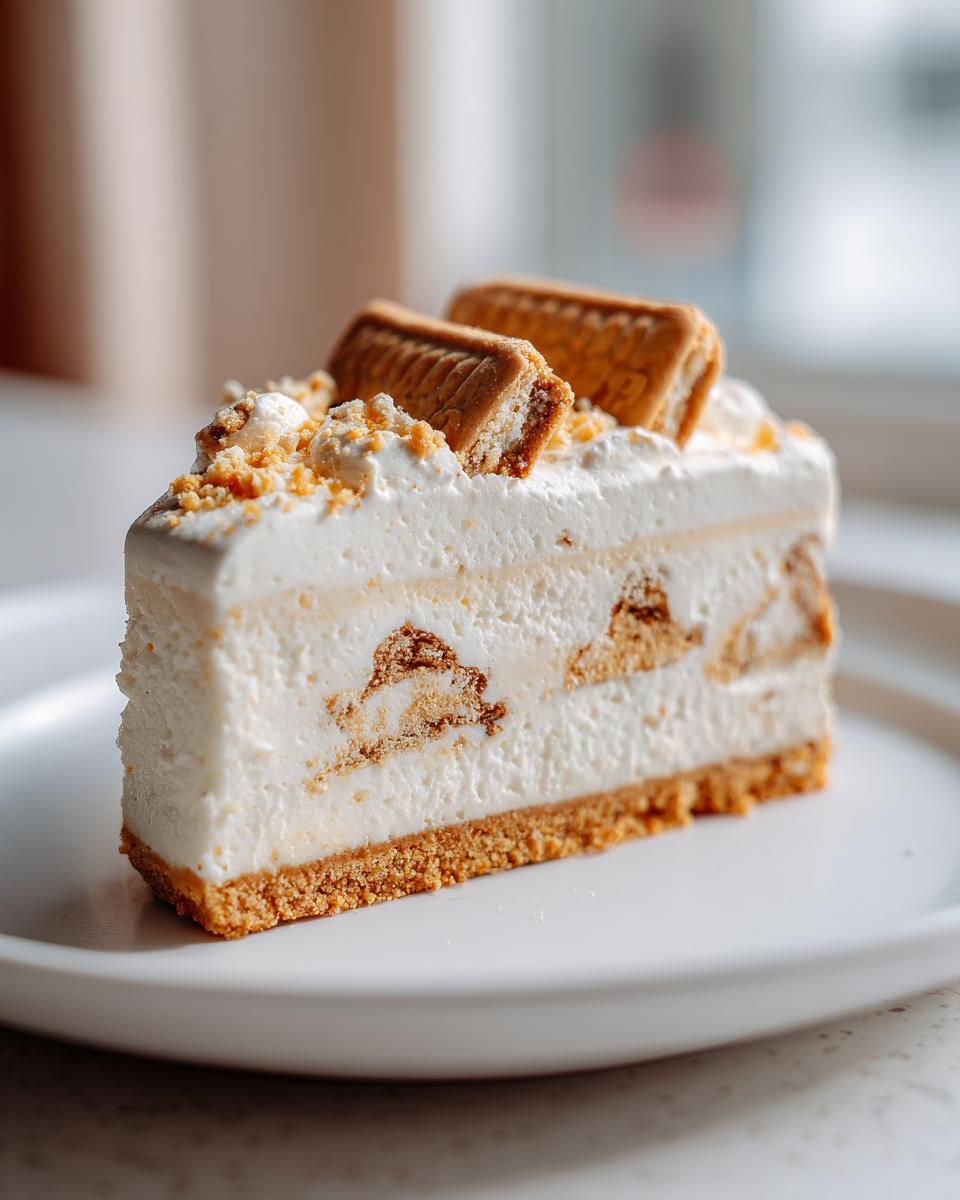
We are starting with a classic, buttery *Graham Cracker Crust Cheesecake* base because it holds up so well underneath all that creamy goodness. You need the crumbs, a little sugar to boost the sweetness, and that melted butter to bind it all together. Don’t press that crust into the pan too hard right away; just a gentle press, bake it for ten minutes, and then let it cool a bit. That initial bake locks in the flavor. Then, when it comes to the filling, remember we need three whole packages—that’s 24 ounces—of cream cheese, and they must be perfectly soft for that smooth, *Creamy Holiday Cheesecake* texture!
The Star: Little Debbie Christmas Tree Cake Count
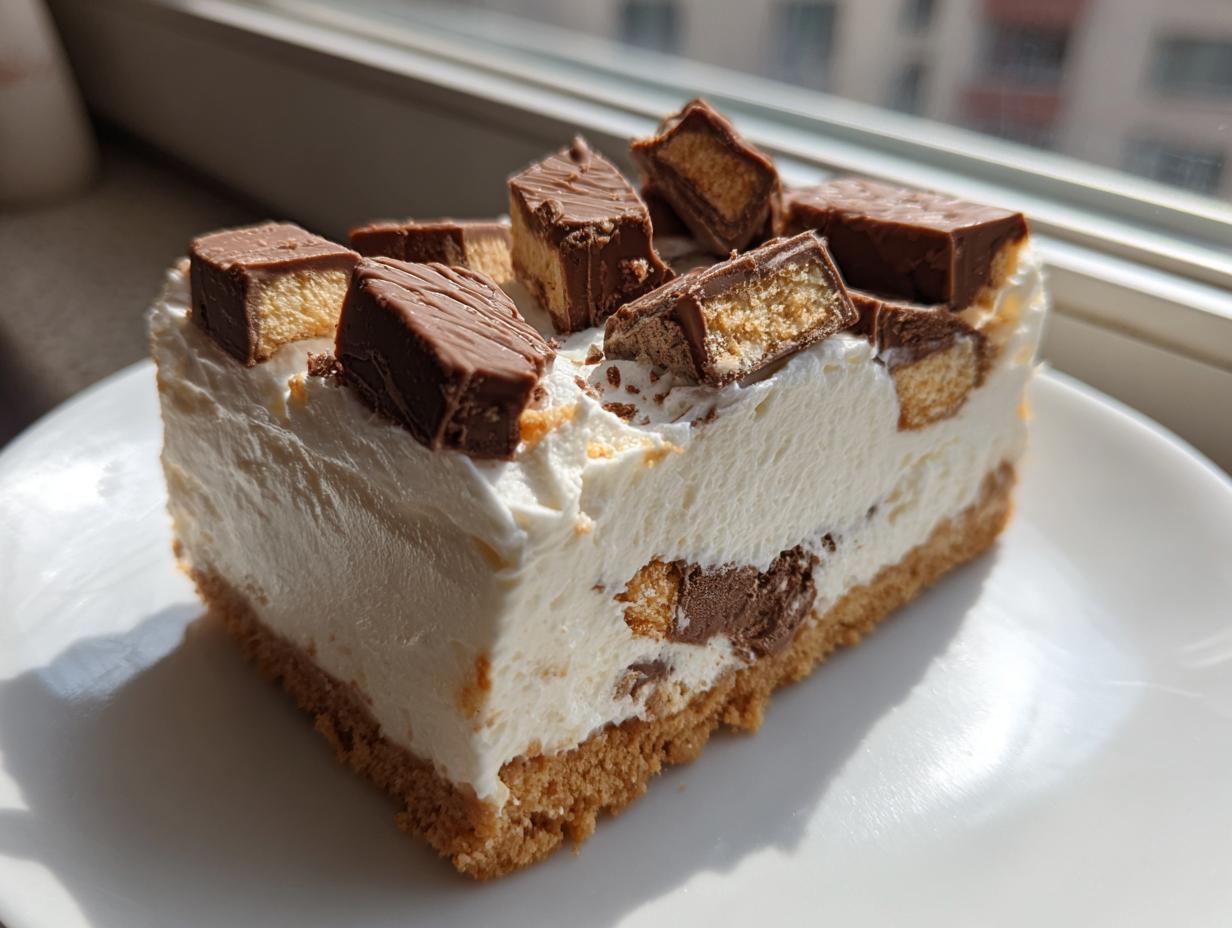
This is where the fun really starts! You’ll need exactly 12 Little Debbie Christmas Tree Cakes. Twelve! Think of them as little edible ornaments waiting to be nestled inside your batter. These cakes are the whole reason we’re making this specific *Cheesecake with Candy Cakes* instead of a plain vanilla one. They are going to add such wonderful texture and that specific, sweet holiday flavor we all remember. Make sure they are unwrapped and ready to go before you start layering your batter. Having your counted cakes nearby makes assembly feel like a breeze and keeps that baking joy flowing!
Step-by-Step Instructions for the Christmas Tree Cheesecake
Alright, deep breaths! We are moving into the assembly phase for our amazing Christmas Tree Cheesecake. This part takes patience, especially when it comes to the water bath. Using that water bath is my number one trick for achieving that incredibly smooth, picture-perfect, *Creamy Holiday Cheesecake* that never cracks. It keeps the heat gentle and even, which is exactly what the cream cheese filling loves. Keep your eyes peeled for the cooling instructions at the end—that’s our little secret to avoiding those inevitable cracks!
Preparing the Crust and Preheating
First things first, preheat your oven to 325 degrees Fahrenheit. While that’s warming up, get your 9-inch springform pan ready. You absolutely must wrap the outside bottom and sides tightly with a couple of layers of heavy-duty aluminum foil. This protects it from the water bath—trust me, you don’t want water seeping into your *Graham Cracker Crust Cheesecake* base! Then, mix those graham cracker crumbs, the small amount of sugar, and the melted butter until it looks like damp sand. Press it firmly into the bottom of that foil-wrapped pan. Pop it into the oven for about 10 minutes just to set it up nicely, then take it out to cool while you whip up the filling.
Mixing the Filling and Layering the Cakes
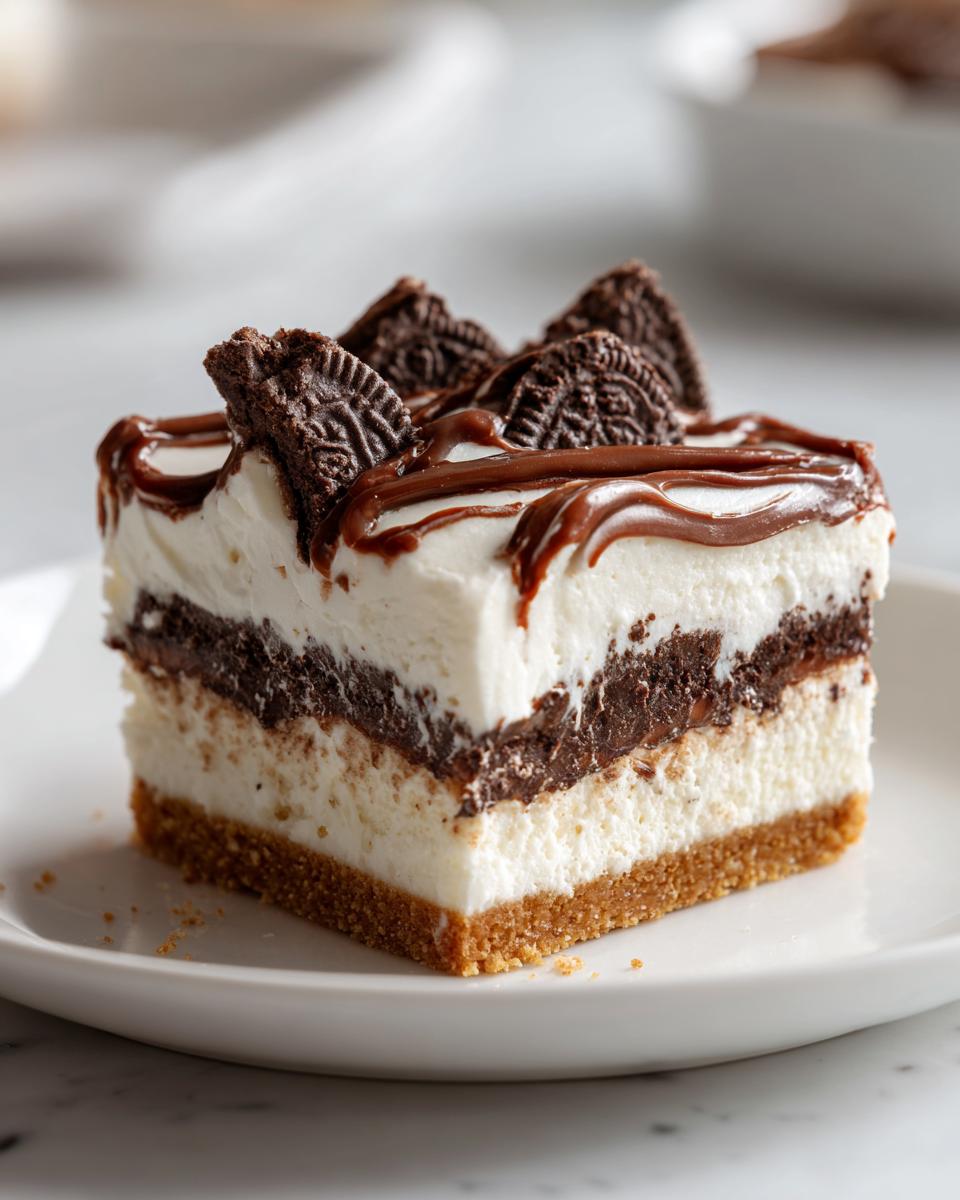
Time for the creamy filling! Beat your softened cream cheese and sugar until it’s totally smooth—no lumps allowed here. Then mix in the vanilla and sour cream. Here’s the crucial part: add your eggs one at a time. I mean it, one at a time! Mix on low speed just until the yellow disappears before adding the next one. If you overmix, you’re introducing too much air, and that leads to cracks later. Once it’s just combined, pour half of that gorgeous batter over your cooled crust. Now, quickly arrange all 12 of your Little Debbie Christmas Tree Cakes in a single layer over the batter. Gently pour the rest of the cheesecake batter over the top, making sure those little cakes are fully covered. Don’t jostle the pan!
The Water Bath Bake and Cooling Schedule
Carefully place your foil-wrapped springform pan inside a larger roasting pan. Now, boil some water—this is important! Slowly pour the hot water into the roasting pan so it comes about halfway up the sides of your springform pan. Slide the whole setup into the oven and bake for 55 to 65 minutes. You are looking for the edges to be set, but the very middle should still have a bit of a wobble, like firm Jell-O. When it’s done, turn the oven OFF, crack the door open slightly, and just let the cheesecake chill inside the oven for a full hour. This slow cool-down prevents the drastic temperature change that causes cracks. After that hour, take it out, remove the foil, and chill it completely in the fridge overnight. It needs at least 6 hours before you even think about decorating!
Transforming Your Cheesecake into Festive Party Treats
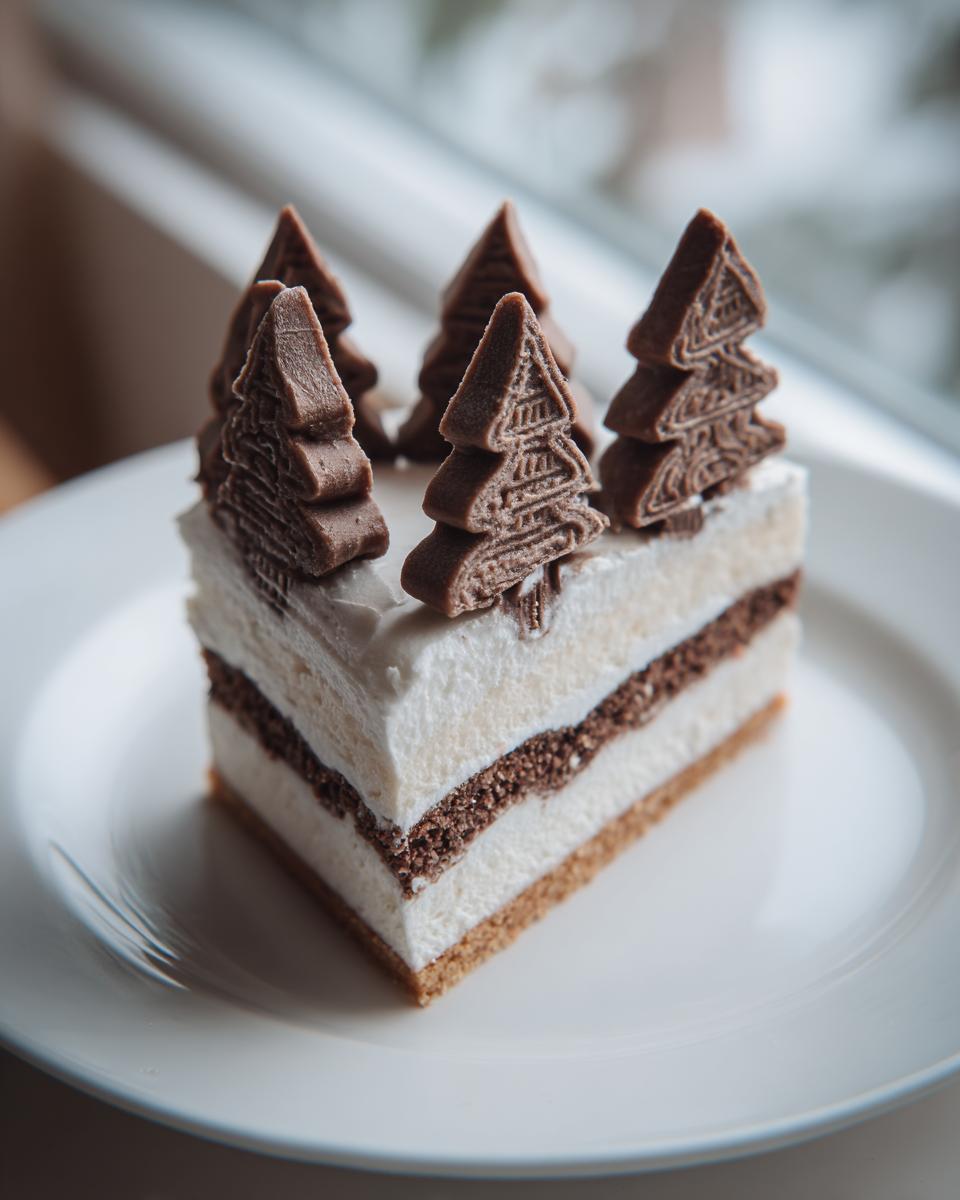
Now that your glorious, creamy holiday cheesecake has chilled overnight, it is time for the best part: making it look like the superstar centerpiece it really is! Because we hid those sweet Little Debbie cakes inside, we want the outside to scream “Christmas!” You don’t need professional piping skills; we are keeping this simple and joyful. This step is where your cheesecake turns from a delicious dessert into one of those show-stopping *Festive Cheesecakes* that everyone talks about long after New Year’s.
If you look back at the recipe details, you’ll see I mentioned optional decorations. I truly believe that what you top it with makes all the difference, especially if you want those clean slices for serving at your big *Christmas Party Treats* event.
Here is my absolute favorite way to make this cheesecake look like a perfectly frosted Christmas tree:
- Green Whipped Cream is Key: Make your favorite whipped cream, but divide it into two bowls. In the smaller bowl, add just a drop or two of green food coloring—I prefer gel coloring. Mix it in gently until you get a lovely, pale Christmas green. You don’t want neon; you want elegant!
- The Tree Topping Method: Using an offset spatula or even a butter knife, apply swaths of the white whipped cream across the top, overlapping them slightly to create a textured, snow-covered look. Then, taking small dollops of the green cream, gently layer it on top of the white, swirling slightly but not completely mixing the colors together. This gives it depth!
- Sprinkle Time: Right after you finish swirly-layering your green and white topping, grab those festive holiday sprinkles—the red, white, and green ones are the best. Sprinkle them liberally across the top. If you wait too long, the sprinkles will sink into the cream.
If you’re looking for other simple appetizers to fill out your holiday menu, check out my recipe for cranberry brie bites—they pair perfectly for easy entertaining!
If you want to keep it super simple, a dusting of powdered sugar is always lovely, especially if the Little Debbie cakes peeked through slightly during baking. Either way, this Christmas Tree Cheesecake Recipe looks fantastic and tastes like pure holiday spirit!
Ingredient Notes and No Bake Christmas Dessert Variation
I always get questions about substitutions when I post this recipe because finding those specific Little Debbie Christmas Tree Cakes can be spotty sometimes! Don’t panic if your grocery store is sold out. Remember how I mentioned my philosophy is about simplifying comfort? That extends to ingredient flexibility, too.
If you’re in a bind and can’t find the Christmas Tree Cakes, don’t let that stop you from making this otherwise incredible dessert. You can substitute them with small cubes of plain pound cake or even thick slices of vanilla cupcakes. It won’t have that exact nostalgic coconut layer, but the creamy vanilla cheesecake filling around those buttery cubes is still heavenly. You’re basically pivoting to a different *Festive Layered Dessert*, and that’s perfectly fine!
Switching to a No Bake Christmas Dessert Option
This recipe is fantastic baked, but I know some of you dread firing up the oven when the kitchen is already packed with holiday dishes. Good news! This recipe shines as a *No Bake Christmas Dessert* too. The filling ingredients are exactly the same, but we skip the oven completely. Instead of baking, you just need to chill the whole thing for at least 8 hours, but honestly, overnight is always better for guaranteed firmness.
For the crust, if you’re going no-bake, I highly recommend swapping out the graham crackers for Golden Oreos! About 1 1/2 cups of crushed Golden Oreos mixed with the melted butter makes an amazing base that doesn’t need that initial bake. It sets up beautifully just from chilling. You can find my full guide on making the best no-bake crusts here: easy creamy garlic sauce recipe.
The Secret to Ultra-Creamy Filling
Whether you bake it or chill it, the secret to getting that luscious texture associated with *Creamy Holiday Cheesecake* is ensuring your cream cheese hits room temperature perfectly. If it’s too cold, it clumps up when you beat it with the sugar early on. I often let mine sit out for two hours, and if I’m really running behind, I microwave the wrapped blocks for just 10 seconds at a time until they give slightly under pressure. That gentle softening makes all the difference between a smooth batter and a lumpy mess!
Just make sure the eggs are slightly cooler than room temperature if you’re doing the no-bake version—we don’t want anything warm messing with the setting process!
Storage and Reheating Instructions for This Holiday Cheesecake Idea
The hardest part about making this Little Debbie version of a Christmas Tree Cheesecake is waiting long enough to eat it! But trust me, the waiting pays off. For any cheesecake, especially one loaded with those lovely Little Debbie Christmas Tree Cakes inside, you absolutely need proper chilling time if you want to serve clean slices. This is vital for maintaining the quality of your *Holiday Cheesecake Ideas*.
If you made the baked version, you must wrap the cooled cheesecake tightly—I mean TIGHTLY—with plastic wrap after it has fully cooled on the counter. Then, transfer it to the refrigerator. It needs a minimum of six hours, but if you can plan ahead, overnight chilling is the gatekeeper to perfection. This extended chill time does two things: it lets the filling firm up completely, and it allows those flavors, especially from the Little Debbie layer, to meld beautifully with the creamy component.
For storage, this cheesecake keeps really well in the fridge for up to four days. Keep it covered the entire time! I often place a piece of plastic wrap directly on the surface of the cheesecake before putting the lid on the springform pan. This stops any kind of air from drying out those beautiful decorations you worked so hard on.
Now, about reheating—honestly, you don’t. Cheesecake is best served cold or slightly cool straight from the fridge. Trying to warm up cheesecake just makes it go soft, gooey, and frankly, a little sad, especially since we have those wonderful, delicate cakes suspended in the middle! If you made the no-bake version, the chilling time is compulsory for it to set correctly, so don’t skimp on that time either!
If you happen to have leftovers that you need to keep longer than four days, slicing it up and freezing works great. Just wrap the slices individually in plastic wrap, then foil, and pop them in a freezer bag. They thaw perfectly overnight in the fridge when you need just a little extra slice of holiday cheer!
Frequently Asked Questions About Cheesecake with Candy Cakes
I totally get it—when you switch up a classic dessert like cheesecake, you end up with a few questions! Making this *Christmas Tree Cheesecake Recipe* is rewarding, but you want to make sure everything goes smoothly, especially when hosting. Here are the things folks ask me most often when bringing this *Festive Layered Dessert* to their holiday gathering.
Can I skip the water bath when making this *Christmas Tree Cheesecake Recipe*?
Look, I know the water bath sounds fussy, but if you want that beautiful, silky, professional texture—the kind that screams *Creamy Holiday Cheesecake*—you really shouldn’t skip it. The water bath creates steam in the oven, which traps moisture and keeps the temperature around the cheesecake incredibly steady. If you bake it straight in the dry oven heat, the edges cook faster than the middle, and that temperature shock is what causes those frustrating cracks on the top. If you absolutely must skip it, you need to be extra careful with the cooling process—the one hour inside the turned-off oven is non-negotiable then!
What is the best way to cut the cheesecake without smearing the topping?
This is essential if you want those perfect slices for your *Christmas Party Treats* presentation! Do not try to cut this straight from the fridge with a room-temperature knife; you’ll just drag the beautiful green whipped cream topping everywhere. Here is my trick: I always use a very tall, thin chef’s knife. Before every single cut, dip the knife into a tall glass of very hot water, wipe it completely dry with a paper towel, and *then* slice. The heat slices cleanly through the cold cheesecake and the soft topping. Wipe and reheat the knife blade between every cut, and you’ll get stunning, clean layers showing off that hidden cake!
How long can I prepare this *Festive Layered Dessert* ahead of time?
This is great news for busy holiday chefs: you can absolutely make this ahead of time! Since the chilling time is mandatory for firmness, you should plan to prepare the entire baked cheesecake—wrapper and all—at least the day before you want to serve it. That gives it a full 24 hours in the fridge to firm up perfectly. If you wait until the day of your party to bake it, you’ll be stressed! If you decorate it with the whipped cream topping too early (say, more than 4 hours ahead), the topping might start to weep a little. So, my recommendation is: Bake and chill the cheesecake completely the day before, and then decorate right before it hits the party table. For more great make-ahead tips, check out some of my favorite strawberry cheesecake cookies recipes which rely on overnight chilling too!
Estimated Nutritional Snapshot
Now, I always start by saying that when we bring out decadent holiday desserts like this Little Debbie Christmas Tree Cheesecake, we aren’t really thinking about the macros, right? We are focusing on smiles and memories! However, since I try to keep everything transparent here on Mia’s Meals, I want to give you a general idea of what’s packed into a serving of this festive delight.
Please keep in mind that these numbers are just estimates based on the recipe ingredients listed and assuming we get exactly 12 nice slices from the whole pie. If your slices are bigger—and I won’t judge!—the numbers will naturally creep up.
- Serving Size: 1 slice (which is that perfect, generous wedge!)
- Calories: Approximately 450 calories
- Sugar: Roughly 35 grams (Hey, it’s a dessert, it needs that sweetness!)
- Fat: Around 28 grams, mostly from that lovely cream cheese and butter in the crust.
- Protein: About 7 grams.
- Cholesterol: Around 95 mg.
This falls squarely into the indulgent *Iconic Christmas Desserts* category, so enjoy it guilt-free! It’s a treat meant for celebration, not for Tuesday night dinner. Focus on the connection it brings—that’s the best nourishment this dessert provides!
Share Your Holiday Baking Creations
Now that you’ve made this incredible, nostalgic Christmas Tree Cheesecake, I really, truly want to see it! Baking, for me, is always about sharing—sharing the food, sure, but also sharing the experience.
Did you decorate yours with the green whipped cream? Or did you try the no-bake version with the Golden Oreo crust? Whether it turned out picture-perfect or had a little adorable wobble, every attempt at bringing these comforting flavors into your home is a win in my book. Please don’t be shy!
Take a picture! I love seeing your beautiful holiday table setups. Leave a comment below this recipe and let me know how the Little Debbie layer held up in your cheesecake. Did you have any brilliant substitutions that worked out great?
If you loved this way of simplifying the holidays and found it helpful for keeping your kitchen stress-free this season, consider leaving a star rating for the recipe. It really helps other busy home cooks find these easy, comforting ideas. Happy holidays to you and your family; thank you for bringing Mia’s Meals into your kitchen!
PrintLittle Debbie Christmas Tree Cake Cheesecake
Make this creamy, nostalgic baked cheesecake featuring a layer of Little Debbie Christmas Tree Cakes inside. It uses a simple graham cracker crust and creates a festive centerpiece for your holiday table.
- Prep Time: 25 min
- Cook Time: 65 min
- Total Time: 100 min
- Yield: 12 servings 1x
- Category: Dessert
- Method: Baking
- Cuisine: American
- Diet: Vegetarian
Ingredients
- 1 1/2 cups graham cracker crumbs
- 1/4 cup granulated sugar
- 6 tablespoons unsalted butter, melted
- 2 (8 ounce) packages cream cheese, softened
- 1 (8 ounce) package cream cheese, softened
- 1 cup granulated sugar
- 1 teaspoon vanilla extract
- 1/4 cup sour cream
- 3 large eggs
- 12 Little Debbie Christmas Tree Cakes
- For Topping (Optional): Green tinted whipped cream and sprinkles
Instructions
- Preheat your oven to 325 degrees Fahrenheit. Wrap the outside of a 9-inch springform pan tightly with heavy-duty aluminum foil.
- Prepare the crust: Mix graham cracker crumbs, 1/4 cup sugar, and melted butter in a bowl until combined. Press the mixture firmly into the bottom of the prepared springform pan. Bake for 10 minutes. Let the crust cool slightly.
- Prepare the cheesecake filling: In a large bowl, beat the softened cream cheese and 1 cup of sugar with an electric mixer until smooth. Beat in the vanilla extract and sour cream. Add the eggs one at a time, mixing just until combined after each addition. Do not overmix.
- Assemble the layers: Pour half of the cheesecake batter over the cooled crust. Arrange the Little Debbie Christmas Tree Cakes in a single layer over the batter. Gently pour the remaining cheesecake batter over the cakes, covering them completely.
- Bake the cheesecake in a water bath: Place the foil-wrapped springform pan into a larger roasting pan. Carefully pour hot water into the roasting pan until the water reaches halfway up the sides of the springform pan.
- Bake for 55 to 65 minutes, or until the edges are set but the center still jiggles slightly.
- Turn off the oven, crack the oven door open slightly, and let the cheesecake cool inside the oven for 1 hour. This prevents cracking.
- Remove the cheesecake from the water bath and foil. Cool completely on a wire rack.
- Chill the cheesecake in the refrigerator for at least 6 hours, preferably overnight, before serving.
- Before serving, decorate the top with green whipped cream and festive sprinkles to resemble a Christmas tree.
Notes
- If you prefer a no-bake version, skip the oven steps. Use a Golden Oreo crust instead of graham cracker, and chill the cheesecake mixture for 8 hours or until firm.
- For the creamiest texture, ensure your cream cheese is fully softened to room temperature before mixing.
- If you cannot find Little Debbie Christmas Tree Cakes, you can substitute with small, plain vanilla cupcakes or pound cake pieces for a similar effect.
Nutrition
- Serving Size: 1 slice
- Calories: 450
- Sugar: 35
- Sodium: 320
- Fat: 28
- Saturated Fat: 17
- Unsaturated Fat: 11
- Trans Fat: 0.5
- Carbohydrates: 42
- Fiber: 1
- Protein: 7
- Cholesterol: 95