
Oh, the holidays! Doesn’t the pressure to bring out that one truly show-stopping centerpiece just give you a little twitch? We all want that restaurant-quality experience at home, but the fear of serving dry, overcooked beef is real. Well, friends, put those worries aside because I have cracked the code on the best standing rib roast (yes, Prime Rib!) that refuses to fail. This isn’t just another recipe; this is my foolproof method using the low-and-slow reverse sear. Trust me, this technique guarantees the juiciest, most tender result every single time—perfect crust, perfect edge-to-edge doneness. Here at Mia’s Meals, my whole mission is simplifying those classic, impressive meals so you can actually enjoy hosting. You can read more about that mission over on our About page. I promise this recipe makes creating a stunning main course totally stress-free. You’re going to love how easy it is to pull off this beautiful roast!
- Why This Garlic Herb Crusted Standing Rib Roast is Your Holiday Centerpiece Roast
- Essential Ingredients for Your Standing Rib Roast
- Preparation Steps for the Perfect Roast Beef
- How to Cook Prime Rib Using the Low Temperature Roast Beef Method
- Finishing the Oven Roasted Rib Roast with a High-Heat Sear
- Resting and Slicing Your Standing Rib Roast
- Tips for a Simple Prime Rib Instructions Success
- Frequently Asked Questions About Your Prime Rib Roast Recipe
- Storage and Reheating Instructions for Leftover Standing Rib Roast
Why This Garlic Herb Crusted Standing Rib Roast is Your Holiday Centerpiece Roast
I know you want to wow your guests, and that’s why we skip straight to treating this roast like the star it is! This isn’t just beef; it’s the centerpiece of your entire celebration. Using my preferred method means you get that restaurant vibe without the fear factor that usually comes with cooking something this expensive!
- Guaranteed Tender Roast Beef Method: We aren’t just throwing this in a hot oven and crossing our fingers. By using the slow-roasting technique first, we treat the meat gently. This Tender Roast Beef Method cooks the roast evenly from edge to edge, meaning no dry, grey outer layer and a happy, medium-rare interior every time. We’re aiming for that sweet spot: pulling it out when it hits 115°F!
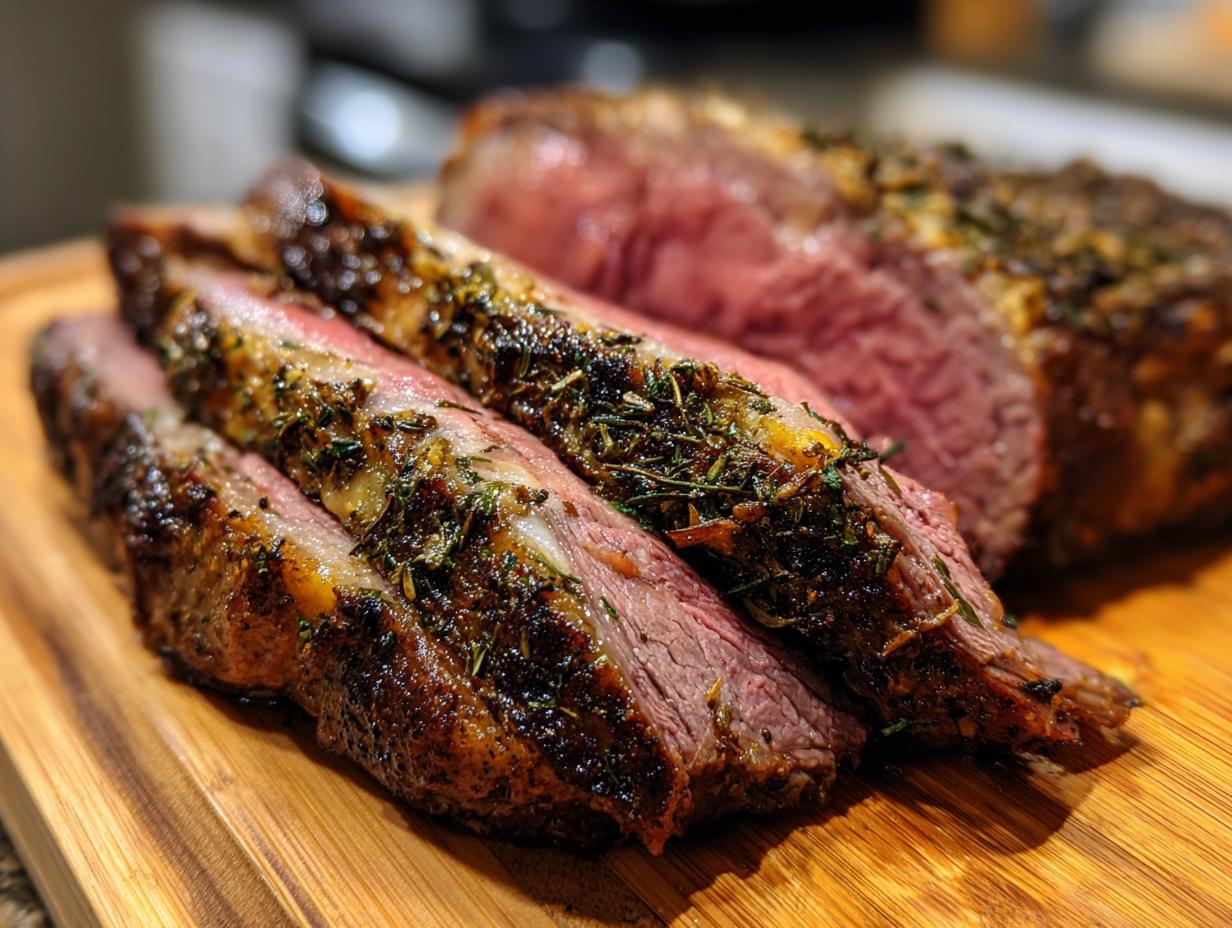
- Flavorful Rib Roast with Herb Crust: Let’s be honest, flavor is everything. That aromatic, deeply savory paste made from garlic, herbs, and butter isn’t just for show. It actually locks in moisture while turning into an incredible, crispy bark. This Rib Roast with Herb Crust gives you that complex, gourmet flavor that people talk about long after the party is over!
Essential Ingredients for Your Standing Rib Roast
When you’re buying a piece of meat this special—a true Showstopper Meat Recipe—you can’t skimp on quality, and frankly, the ingredients need to be treated right! We’re keeping the ingredient list super simple because the beef really needs to shine through. You need a beautiful, well-marbled standing rib roast, of course. Then we build our flavor around fresh garlic, earthy dried rosemary and thyme, good kosher salt, pepper, and, most importantly, soft butter. Don’t even think about using cold butter; it just won’t mix right! For clarity, here is exactly what you’ll need:
- 1 Standing Rib Roast (Prime Rib), 3-5 lbs, 2-3 ribs
- 3 tablespoons kosher salt
- 1 tablespoon black pepper
- 1 tablespoon dried thyme
- 1 tablespoon dried rosemary
- 6 cloves garlic, minced
- 4 tablespoons unsalted butter, softened
- 1 tablespoon olive oil
Ingredient Notes and Butcher Tips
Listen, this is where treating your butcher right pays off big time! Since this is a bone-in rib roast tutorial, I always, always ask them a favor. Ask if they can “french” the bones for you. That just means they trim off the excess fat and meat hanging off the bottom ribs. They then tie those bones back onto the roast for roasting. Why do we do this? Because after it’s cooked perfectly, you can easily snip those ties and slide the big bones right out, making slicing for serving so much cleaner! It’s a little trick that makes a huge difference when you’re serving guests.
Preparation Steps for the Perfect Roast Beef
Okay, now we get down to the real work of making this Perfect Roast Beef. Putting the roast together is really relaxing once you get into the rhythm, but two steps right at the start are absolutely non-negotiable if you want that beautifully uniform cook. Don’t rush these initial prep steps; they set the stage for success later on.
Bringing the Standing Rib Roast to Room Temperature
This is one of those boring steps that people skip, and then they wonder why the edges are cooked well done and the middle is still raw! You must pull your standing rib roast out of the fridge a full 2 to 3 hours before you plan on putting it anywhere near heat. This lets the meat slowly equalize its temperature. If you put a cold chunk of beef into a low oven, the outside will cook forever trying to catch up to the center, and you end up with an overcooked edge!
Creating the Garlic Herb Roast Rub
Next up is making that glorious paste that turns into your crust. Grab your softened butter—and I mean *softened*, like butter you left out on the counter all morning, not melted soup! If it’s melted, it’ll just run right off the meat. Mix that butter with your minced garlic, salt, pepper, thyme, and rosemary until it’s all fragrant and gorgeous. Then, you’ll pat your roast completely dry with paper towels (dry meat equals crispy crust, remember?). Rub it all over with olive oil first, and then physically massage that herb butter paste all over every surface of the beef. Spread it thick! If you want to see a pro do this exact application technique, you can check out a great example over on this site.
How to Cook Prime Rib Using the Low Temperature Roast Beef Method
This is where the magic happens, folks! We are ditching the harsh, high heat for what I call true low-and-slow cooking. This Low Temperature Roast Beef Method is key to getting that even cook we talked about. First things first, you absolutely need a reliable meat thermometer. Don’t try to guess or rely on timing alone for a roast this size; the meat thermometer is your best friend! Preheat your oven to a gentle 250°F (120°C).
Place your seasoned roast, fat side up, on a rack in your roasting pan. Make sure that thermometer probe is seated firmly in the thickest part of the roast, but make absolutely certain it isn’t touching any bone underneath—the bone will read hotter and trick you into pulling the roast too early! We are roasting slowly until that thermometer climbs up to 115°F (46°C) if you’re aiming for medium-rare. This usually takes about 15 to 20 minutes per pound, but always trust the thermometer over the clock!
Once it hits that mark, we pull it out for the next stage. If you need amazing flavor for dipping later, I always whip up a quick creamy garlic sauce while this slow cook is happening. For those who love Ina Garten’s approach, this low-temp roast is similar to her famous reverse sear technique, letting the meat do all the hard work before we crisp it up. See how simple it is for a holiday roast? You can see Ina Garten’s take on the reverse sear, which is very similar, over at this link.
Monitoring Internal Temperature for a Juicy Beef Roast
I cannot stress this enough: Use a thermometer! If you skip this, you risk ruining your beautiful cut of meat. For that perfectly Juicy Beef Roast that melts in your mouth, pulling it at 115°F is critical. Why? Because we have a high-heat blast coming up next, and that resting period afterward causes significant carryover cooking. That final temperature rise is where we nail medium-rare perfection, and it all starts with knowing exactly when to pull it out of the low oven. Don’t trust the hour count; trust the temperature gauge!
Finishing the Oven Roasted Rib Roast with a High-Heat Sear
Alright, so your meat has slowly, gently coaxed itself up to that perfect 115°F—isn’t that amazing progress? Now, we need to give it that incredible professional finish! This is the step that turns a great oven roasted rib roast into a masterpiece. Right when you pull that roast out of the 250°F oven, you need to crank it up, and fast. I mean blast it with 450°F (230°C).
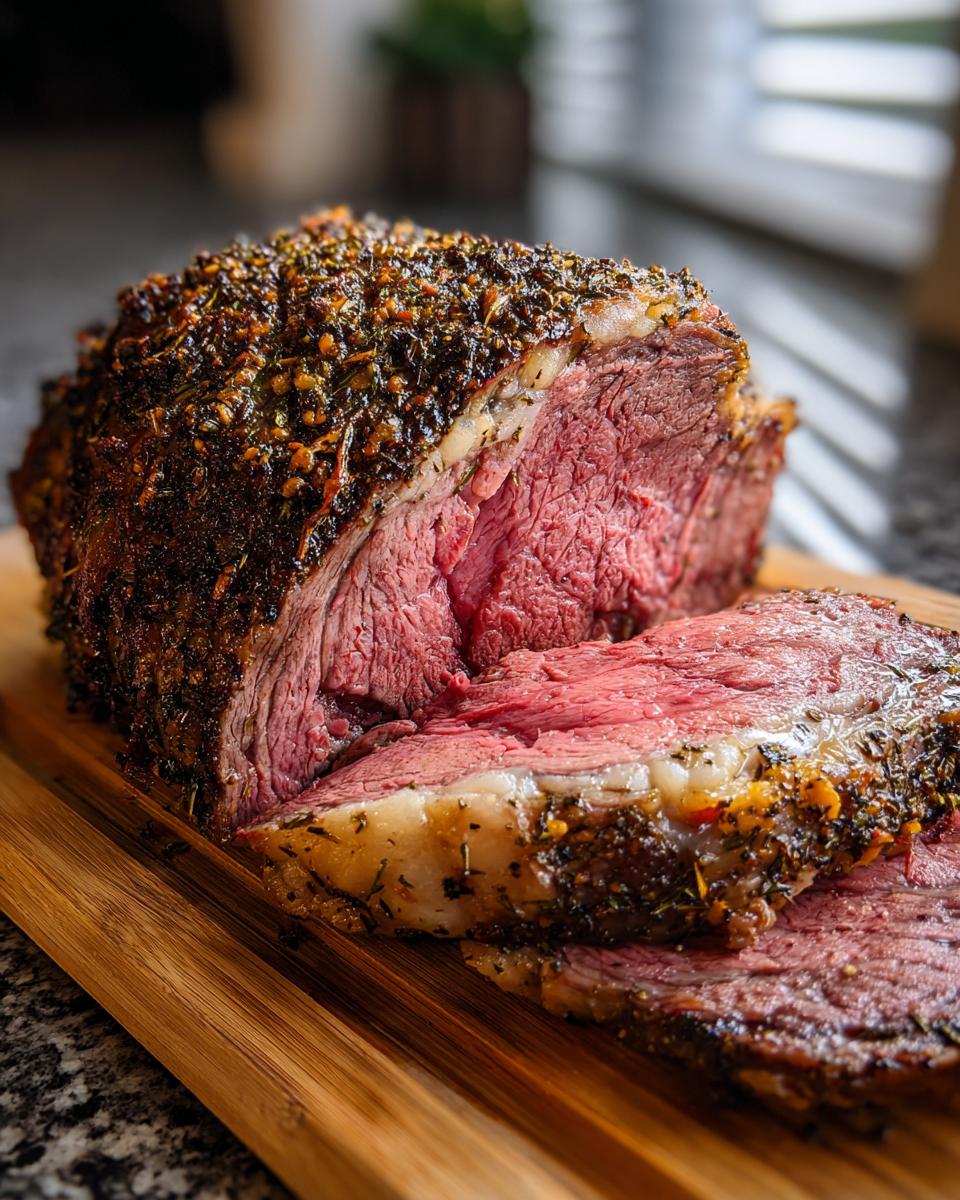
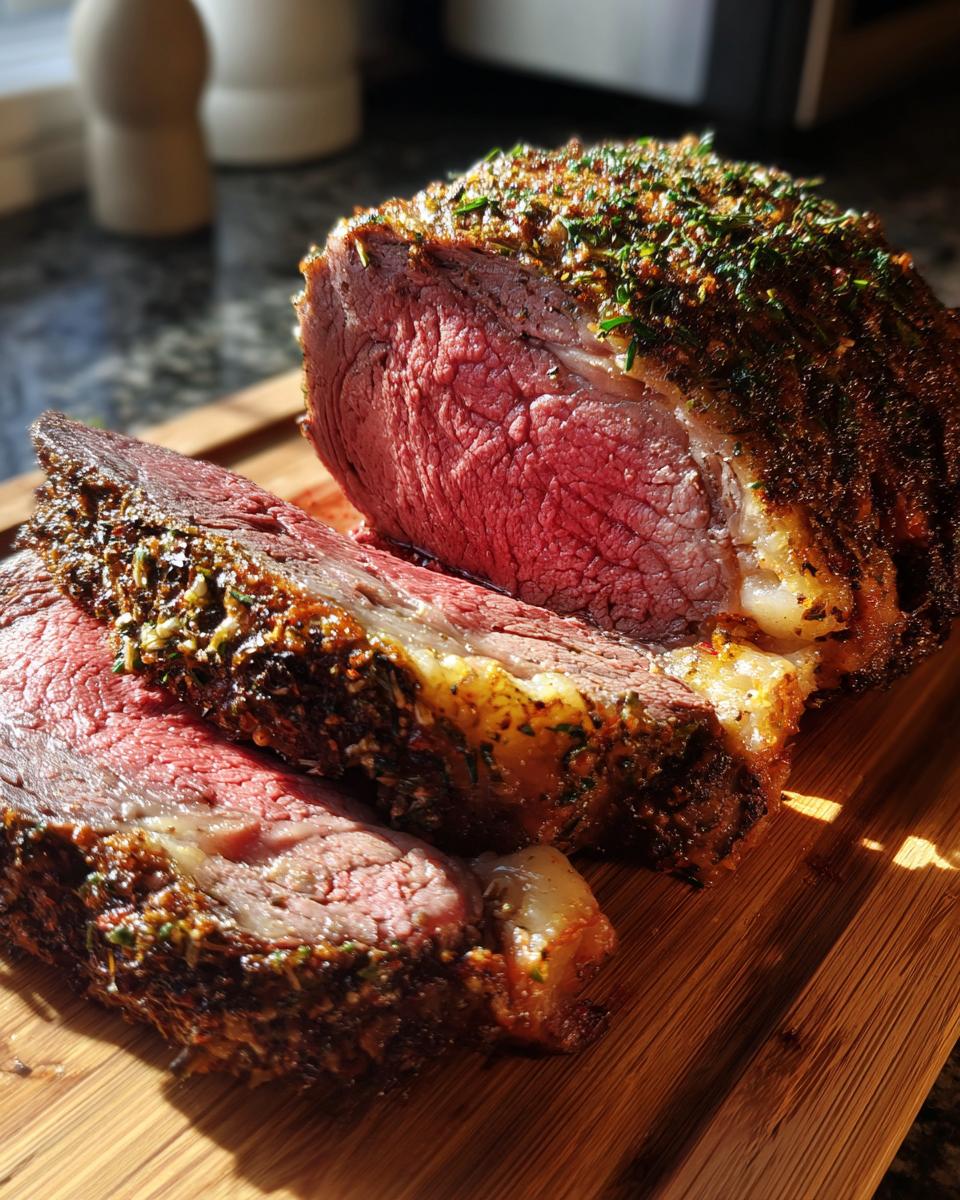
Put the roast right back in the oven—still on that rack in the pan, don’t move it! This high heat cooks the exterior quickly. Since the inside is already nearly done, we only need about 10 to 15 short minutes in that extreme heat. This is purely to create that gorgeous, deep brown, crispy layer right over our garlic herb butter. Seriously, this sear is what delivers that restaurant-quality result. You want that crust to look dark and rugged, but you need to watch it closely so it doesn’t burn!
Resting and Slicing Your Standing Rib Roast
You’ve done the slow cook, you’ve nailed the high-heat sear—now comes the hardest part: waiting! That roast is practically screaming at you from the counter, but you absolutely cannot touch it for at least 20 minutes once it comes out of the 450°F oven. I know, I know, it feels like forever, especially when everyone is hungry, but this resting period is just as crucial as the cooking itself. Think of it as the final, essential phase of your how to cook prime rib journey.
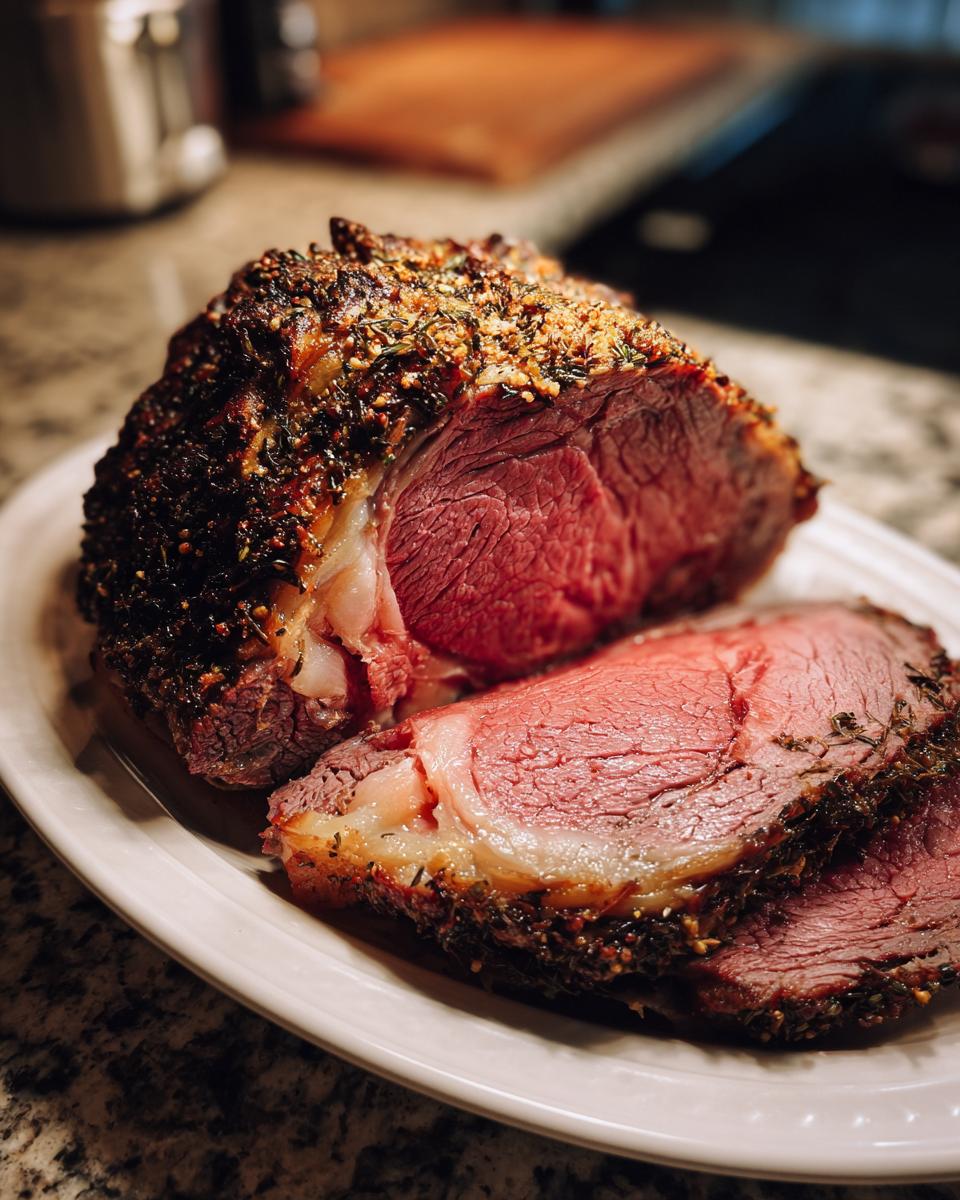
When the roast is resting under some loose foil, two great things are happening. First, the exterior crust stays crispy because we tented it loosely—if you wrap it tight, that steam ruins all your hard work! Second, and most importantly, the juices that were pushed toward the middle by the heat are now redistributing back through the meat. This is called carryover cooking, and it’s what ensures every single slice is succulent. While it rests, I usually get my side dishes ready—maybe some fluffy dinner rolls to mop up any leftover juices. Aim for the internal temperature to rise a final 5 to 8 degrees while it rests; if you pulled it at 115°F, you’re looking at hitting that perfect 125°F to 130°F medium-rare sweet spot.
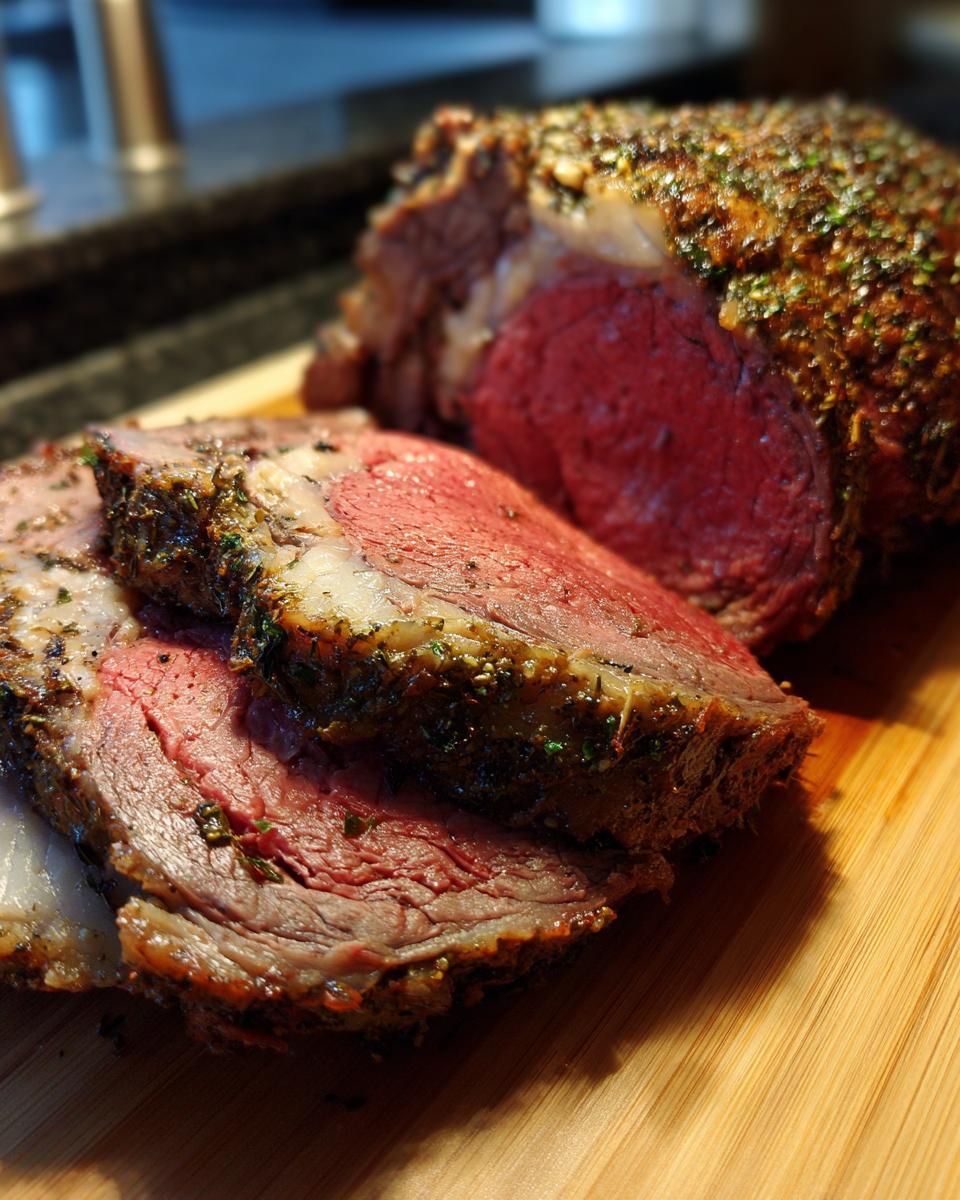
Once the time is up and the meat is relaxed, it’s slicing time! Since we asked the butcher to tie those bones back on, carving should be a breeze. Take a sharp, thin slicing knife, slide it right between the bones, and gently run the knife along the bone to release the roast from its support structure. Then, just slice across the grain into your desired thickness. If you have a 3-rib roast, you’ll get 2-3 beautiful slices per rib. Serve those gorgeous, edge-to-edge pink slices immediately and accept all the praise—you handled this holiday centerpiece like a total pro!
Tips for a Simple Prime Rib Instructions Success
So, you’ve mastered the reverse sear, which I truly stand by for incredible results, but maybe you need a quick fix for next time or you’re just curious about other ways to tackle a huge piece of beef. I’ve got a couple of quick-hitter tips that will help make this whole thing feel calmer, even if you’re hosting a massive crowd for your Christmas Beef Dinner.
First, let’s talk alternatives. If the slow-and-low plus the high-heat sear just feels like too much fuss or time for your schedule, you can always go back to the traditional method. Just skip steps 4 through 7! Instead, rub that roast down with your garlic butter mixture and pop it into an oven preheated to a steady 350°F (175°C). Roast it until your thermometer hits your desired finish temperature. It works! It really does! But I’ll warn you, you won’t usually get that perfectly uniform pink center that the low-and-slow method gives you. It’s faster, but for the absolute best tenderness, the reverse sear wins every time. For more inspiration on getting those impressive results, check out some tips here!
Also, remember that whole thing about asking the butcher to tie the bones back on? That’s clutch! But if you’re going boneless, just make sure you use a trussing twine every 2 inches or so around the roast to keep it as uniform a cylinder shape as possible. Odd shapes cook unevenly, and we are striving for that perfect, even cook for one glorious Perfect Roast Beef!
Serving Suggestions for Your Celebration Roast Meal
This beef is the star, so your sides need to be supporting actors, not drama queens trying to steal the show! For a truly memorable Celebration Roast Meal, you want classics that complement the rich meatiness. Mashed potatoes are a must—I mean, have you tried my cheesy bacon twice-baked mash recipe? They are divinely rich and perfect for soaking up any leftover juices. Skip the overly complex sides and stick to simple roasted root vegetables like carrots and Brussels sprouts tossed simply with olive oil, salt, and pepper. Let your incredible standing rib roast be the hero of the table!
Frequently Asked Questions About Your Prime Rib Roast Recipe
I totally get it; when you’re making a showstopper like this, you need answers right away! Dealing with a huge chunk of meat can feel daunting, but let’s tackle those last few nagging worries so you can walk into that holiday dinner completely confident. These questions always pop up, and I’ve got the straightforward answers you need!
What internal temperature is considered a perfect standing rib roast?
This is the million-dollar question, isn’t it? The temperature chart is your guide, but remember, we pull it out early! For a true medium-rare—that beautiful pink from edge to edge—you should pull the roast out when the thermometer reads 115°F. After resting for 20 minutes, it will coast up to the perfect serving temperature of 125°F to 130°F. If you push it past 135°F, you start edging toward medium, and if you want rare, pull it closer to 110°F. Never, ever cook by time alone!
Can I use a boneless cut instead of a bone-in rib roast tutorial?
You sure can, but I strongly recommend sticking with the bone-in cut if you can manage it. When you’re following a detailed bone-in rib roast tutorial like this one, those bones are doing hard work for you! They act like built-in insulation, helping keep the meat closest to them from overcooking while the slow roast is going on. Plus, they add tremendous flavor right into the meat! If you must go boneless, just be extra diligent about keeping that meat thermometer away from the pan bottom, as boneless roasts tend to cook faster on the bottom surface.
How do I calculate Roast Beef Cooking Times for a larger roast?
For the low-and-slow portion at 250°F, the general rule of thumb I gave you is right around 15 to 20 minutes per pound. So, if you have a massive 6-pound roast, you’re probably looking at at least 90 minutes to 120 minutes before you even check the temperature. However, please hear me on this: that is just an estimate! If you have a much larger roast, say 8 or 9 pounds, that estimate might shift by another half hour or more. Seriously, the only way to guarantee success for your Roast Beef Cooking Times is to use that reliable instant-read thermometer. It’s the secret weapon to avoiding kitchen disasters!
Speaking of perfect pairings for your beef, if you’re looking for something creamy and decadent to accompany that tender, juicy roast, don’t forget to check out my recipe for cheesy bacon twice-baked potatoes. They are practically mandatory!
Storage and Reheating Instructions for Leftover Standing Rib Roast
So, you actually managed to have leftovers from your stunning standing rib roast? Wow! That means either you cooked a giant one, or your crowd just wasn’t quite as hungry as we anticipated—either way, we need to treat those precious few slices right so they taste almost as good tomorrow night!
The key to leftovers is moisture retention. Beef that has been sliced tends to dry out fast, especially if you try to reheat it directly on the stovetop or in a microwave. First, make sure you store those remaining slices tightly wrapped in plastic wrap, and then put them into an airtight container. They will keep wonderfully in the refrigerator for about three to four days. If you have massive amounts you want to save longer, slicing and freezing them in small portions works great too, but for the next few days, refrigeration is perfect.
When it comes time to reheat, you must use a little liquid to bring that beautiful texture back to life. Never reheat a slice directly! Instead, get a small saucepan and add just a splash of beef broth, water, or whatever pan juices you managed to save. Bring that liquid to a very gentle simmer—barely a bubble. Then, simply lay your slices of roast right into that liquid, cover the pan, and turn the heat way, way down to low. Let them warm through slowly for just a couple of minutes until they are heated gently. They will absorb that moisture and taste just heavenly!
If you’re reheating a larger, uncut piece (lucky you!), the best way is to wrap the entire thing tightly in foil, place it in a shallow baking dish with about half an inch of beef broth in the bottom, and put it back into a really low oven—think 275°F (135°C). Heat it slowly until it reaches about 120°F internally. If you ever are looking for ways to transform your leftovers into a whole new meal, like maybe a hearty bake, you can see some creative ideas over on my leftover casserole page!
PrintFoolproof Garlic Herb Crusted Standing Rib Roast (Prime Rib)
Cook an impressive, tender, and juicy standing rib roast with a flavorful garlic herb crust using a low-and-slow method followed by a high-heat sear. This recipe guarantees a perfect centerpiece for your holiday dinner.
- Prep Time: 20 min
- Cook Time: 2 hr 30 min
- Total Time: 3 hr 30 min
- Yield: 6 servings 1x
- Category: Dinner
- Method: Oven Roasting (Low and Slow)
- Cuisine: American
- Diet: Low Calorie
Ingredients
- 1 Standing Rib Roast (Prime Rib), 3-5 lbs, 2-3 ribs
- 3 tablespoons kosher salt
- 1 tablespoon black pepper
- 1 tablespoon dried thyme
- 1 tablespoon dried rosemary
- 6 cloves garlic, minced
- 4 tablespoons unsalted butter, softened
- 1 tablespoon olive oil
Instructions
- Remove the roast from the refrigerator 2 to 3 hours before cooking to allow it to come to room temperature.
- Preheat your oven to 250°F (120°C).
- In a small bowl, combine the softened butter, minced garlic, salt, pepper, thyme, and rosemary to create the herb butter paste.
- Pat the entire surface of the roast dry with paper towels. Rub the roast evenly with olive oil, then generously coat all sides with the garlic herb butter mixture.
- Place the roast, fat side up, on a rack in a roasting pan. Insert a meat thermometer into the thickest part of the meat, avoiding the bone.
- Roast at 250°F (120°C) until the internal temperature reaches 115°F (46°C) for medium-rare. This will take approximately 15-20 minutes per pound.
- Remove the roast from the oven. Increase the oven temperature to 450°F (230°C).
- Return the roast to the hot oven and sear for 10 to 15 minutes until the exterior crust is deep brown and crisp.
- Remove the roast from the oven. Tent it loosely with foil and let it rest for at least 20 minutes before slicing. The internal temperature will rise during resting to your desired doneness (aim for 125°F to 130°F for medium-rare).
- Slice between the bones to serve.
Notes
- For bone-in roasts, ask your butcher to ‘french’ the bones (trim excess fat) and tie them back on for easier carving after cooking.
- If you prefer a traditional high-heat roast, skip the low-temperature step and roast at 350°F (175°C) until the desired internal temperature is reached.
- Use fresh herbs if available for the best flavor in the crust.
Nutrition
- Serving Size: 6 oz cooked
- Calories: 450
- Sugar: 0
- Sodium: 450
- Fat: 30
- Saturated Fat: 12
- Unsaturated Fat: 18
- Trans Fat: 0
- Carbohydrates: 0
- Fiber: 0
- Protein: 40
- Cholesterol: 150