
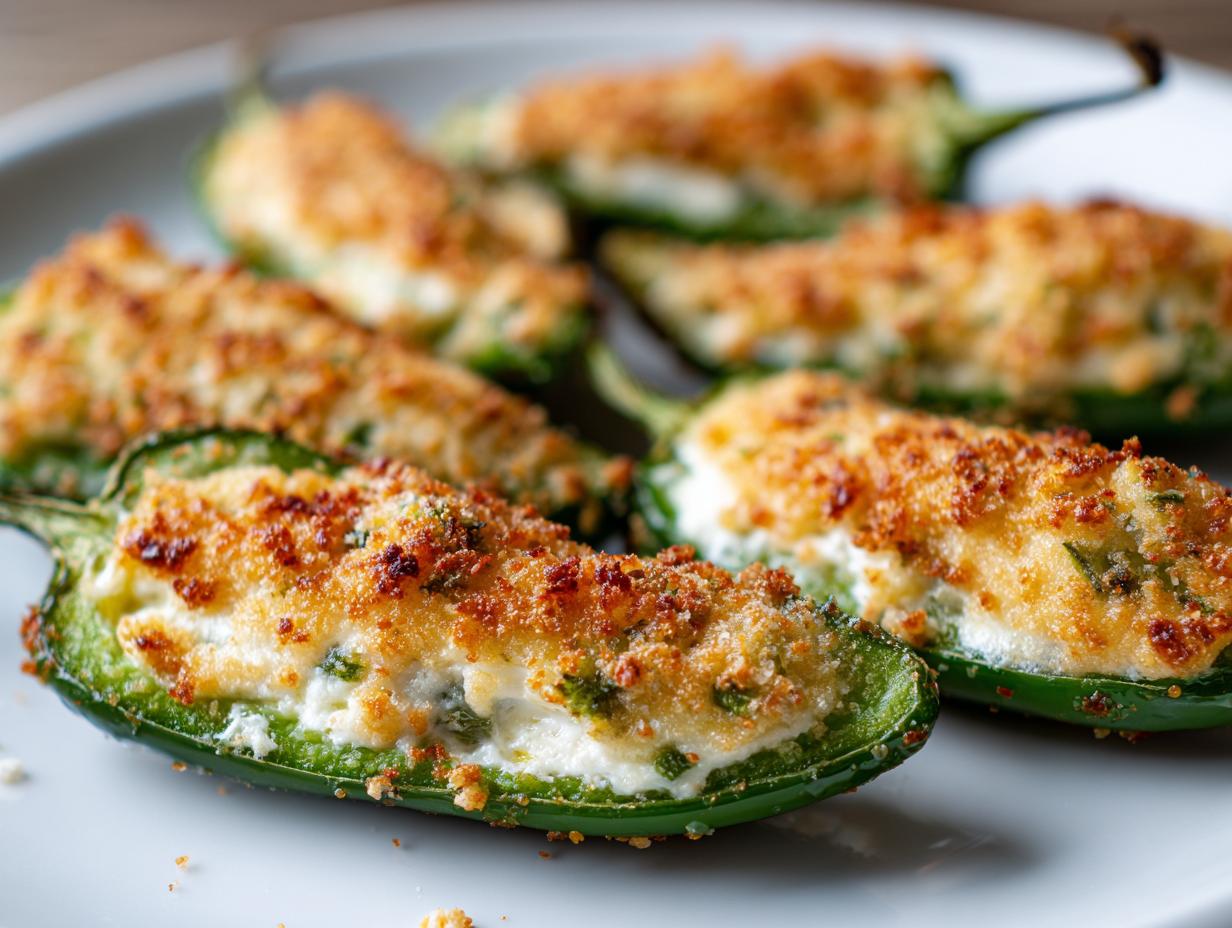
If you’re looking for that perfect spicy appetizer that screams ‘game day’ but whispers ‘easy cleanup,’ you’ve found your winner. Forget the splattering oil, because these easy baked jalapeño poppers skip the deep-fry mess entirely! We’re talking about that beautiful, creamy center stuffed snug inside a tender pepper, all baked golden brown. Here at Mia’s Meals, I’m always hunting for the most direct path to delicious comfort food, and these fit the bill perfectly. I want you to spend less time stressing over complicated steps and more time enjoying that cheesy, spicy kick. Trust me, this baked method is my secret weapon for keeping big crowds happy without spending hours chained to the stove. It’s all about making tradition fit into your busy life.
- Why You Will Make These Baked Jalapeño Poppers Again and Again
- Essential Ingredients for Perfect Cream Cheese Stuffed Jalapeños
- Step-by-Step Instructions for Easy Baked Jalapeño Poppers
- Tips for Making the Best Jalapeño Poppers Every Time
- Variations on Classic Jalapeño Poppers
- Serving Suggestions for These Spicy Appetizer Poppers
- Storage and Reheating Instructions for Leftover Jalapeño Poppers
- Frequently Asked Questions About Jalapeño Poppers
- Estimated Nutritional Information for Jalapeño Poppers
- Estimated Nutritional Information for Jalapeño Poppers
- Share Your Experience Making These Jalapeño Poppers
Why You Will Make These Baked Jalapeño Poppers Again and Again
Honestly, once you try making these in the oven, you might never go back to frying! They are just so much easier, and the texture is fantastic. Forget the splatter and the oil smell; these are perfectly golden and ready for the game day spread without all the fuss you’d expect.

- They deliver that addictive spicy appetizer poppers flavor without the messy, intimidating deep fryer. Baking is just so much simpler!
- The filling is pure comfort: richly flavored cream cheese stuffed jalapeños that melt beautifully when baked.
- You control the heat! By taking the time to scoop out the pith, you tame the fire, leaving just a pleasant warming tingle.
- If you choose to wrap them, these become totally irresistible bacon wrapped poppers that crisp up perfectly right there in the oven.
- They come out looking gorgeous—golden brown and bubbly—making them look much fancier than the effort they require.
- These are the ultimate low-fuss baked jalapeño poppers for any gathering, guaranteed to be the first thing people grab.
It’s just the right balance of heat and cool creaminess, making everyone ask for your simple recipe! I love showing people how easy it is to get that perfect result without deep frying.
Essential Ingredients for Perfect Cream Cheese Stuffed Jalapeños
You need surprisingly few things for this recipe to shine, but those few things? They have to be right. When you’re making cream cheese stuffed jalapeños, precision matters, especially with how soft that cheese needs to be! This simple list is what guarantees that lovely, gooey, spicy bite.
- 12 fresh jalapeño peppers
- 8 ounces cream cheese, softened—make sure it’s soft!
- 1 cup shredded sharp cheddar cheese. Sharp is important for flavor!
- 1 teaspoon garlic powder
- 1/2 teaspoon onion powder
- 1/4 teaspoon salt
- 1/2 cup plain breadcrumbs
- 2 tablespoons melted butter (for crisping up the topping)
- Optional: 12 strips bacon, halved (if you’re going bacon wrapped!)
Ingredient Notes and Substitutions for Jalapeño Poppers
Okay, let’s talk about the peppers themselves because this is where the heat level is truly determined. Please, please, please wear kitchen gloves when you cut these open! That oil—the capsaicin—will burn later, trust me on this one. When you slice them lengthwise, take your time with a small spoon and scrape out every bit of the white, pithy membrane you can reach. That’s where most of the fire lives, so removing it gives you that pleasant warmth instead of a five-alarm fire in your mouth.
If you happen to be out of sharp cheddar, you can absolutely swap it for Monterey Jack. That melts beautifully and keeps the flavor profiles creamy without adding too much sharpness. Some folks even mix in a little smoked paprika for extra depth, but stick to the recipe the first time so you know how great the original is!
Step-by-Step Instructions for Easy Baked Jalapeño Poppers
This recipe walks you through getting those irresistible poppers ready for the oven without any fuss. We are sticking to that 400°F temperature, which is key for tender peppers and perfectly melted cheese. Just follow the steps below, and you’ll have a gorgeous tray of baked goodness ready in under 25 minutes of cook time!
Preparing the Jalapeño Poppers for the Oven
First things first, safety check! Take a moment and put on those gloves. I know it seems like overkill, but trust me, washing your hands twenty times won’t get the oil off. Preheat your oven to 400 degrees Fahrenheit and line up your baking sheet with parchment paper—that makes cleanup a breeze later on.
Next, grab a small knife and slice all twelve jalapeños right down the center, making two halves from each pepper. Now comes that crucial part for managing the heat: use a little spoon or the tip of the knife to scrape out all the seeds and that white, flimsy membrane inside. You want that gorgeous pepper flavor, not overwhelming spice, so be thorough when removing the pith! Once they are hollowed out, it’s filling time.
In a separate bowl, mix up your filling. You need the softened cream cheese, the sharp cheddar, garlic powder, onion powder, and salt. Stir this really well until everything is completely combined and wonderfully creamy. You want a smooth mixture here so it spoons easily into the pepper boats.
Assembling and Baking Your Jalapeño Poppers
Spoon that cheesy filling generously into the hollowed-out jalapeño halves. Don’t skimp! If you’re making the optional bacon wrapped poppers, take a half-strip of bacon and wrap it snugly around each filled pepper half. Sometimes I use a toothpick to hold the bacon tight, but often it stays put if you wrap it well. Now, mix your breadcrumbs with the melted butter, and sprinkle that buttery crumble right over the tops of the cheese filling.
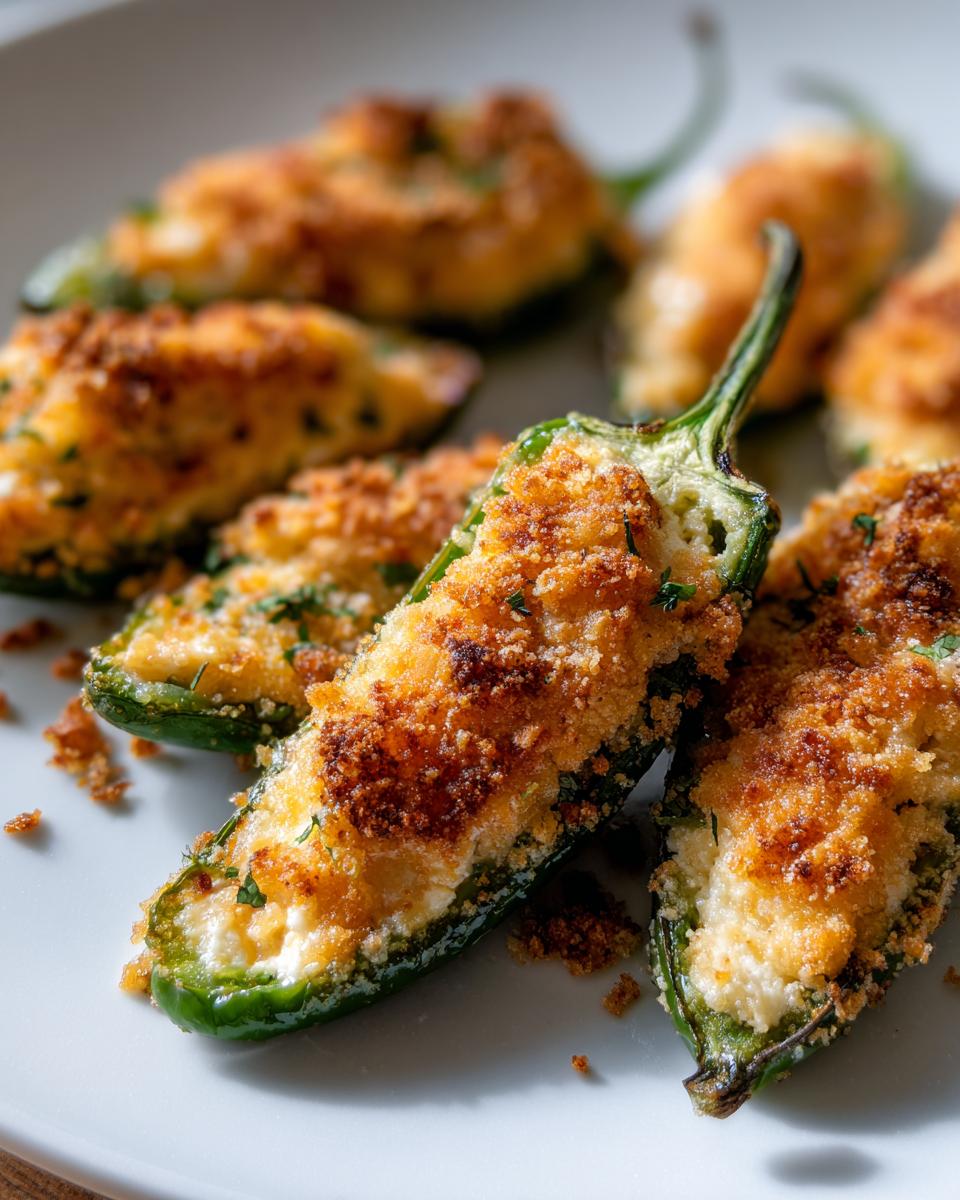
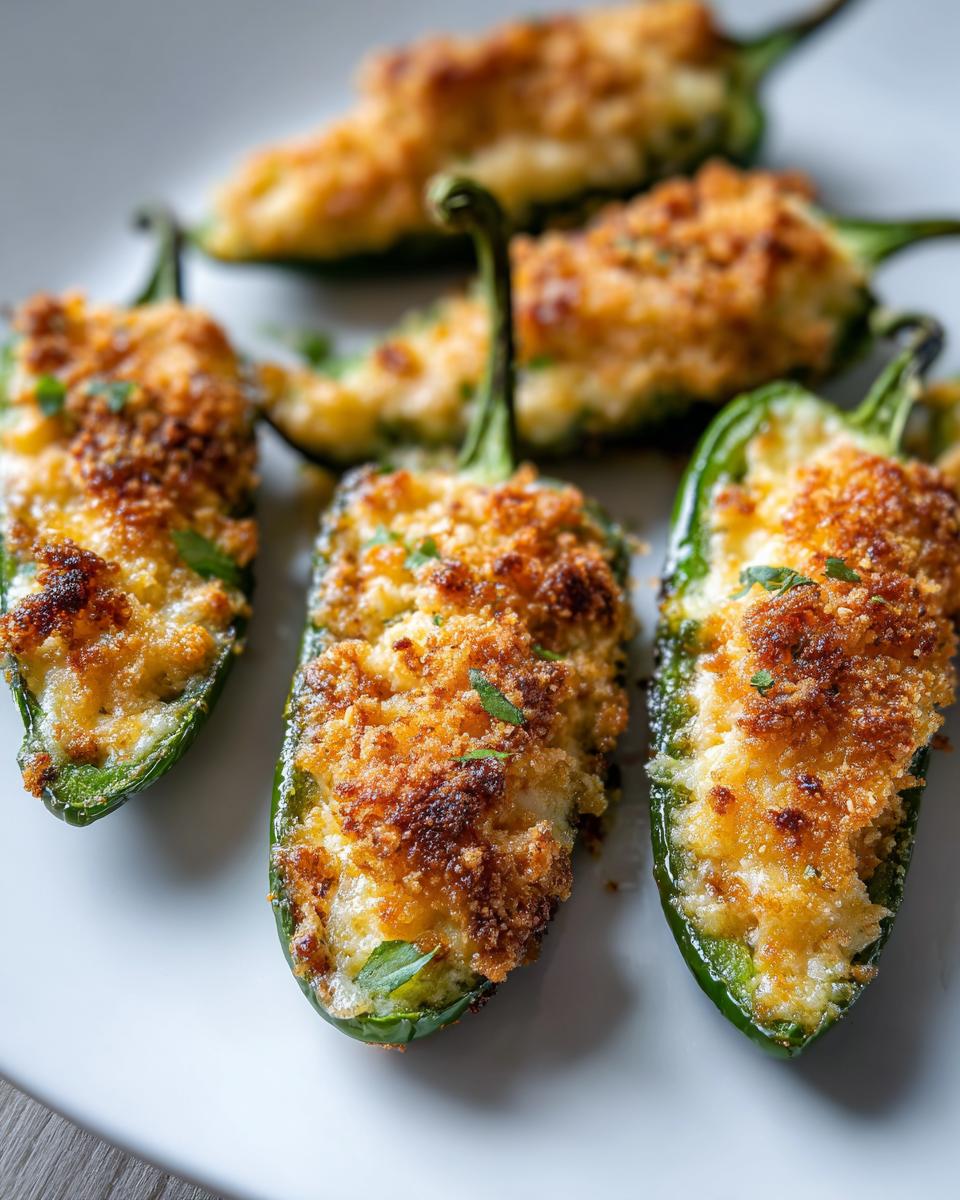
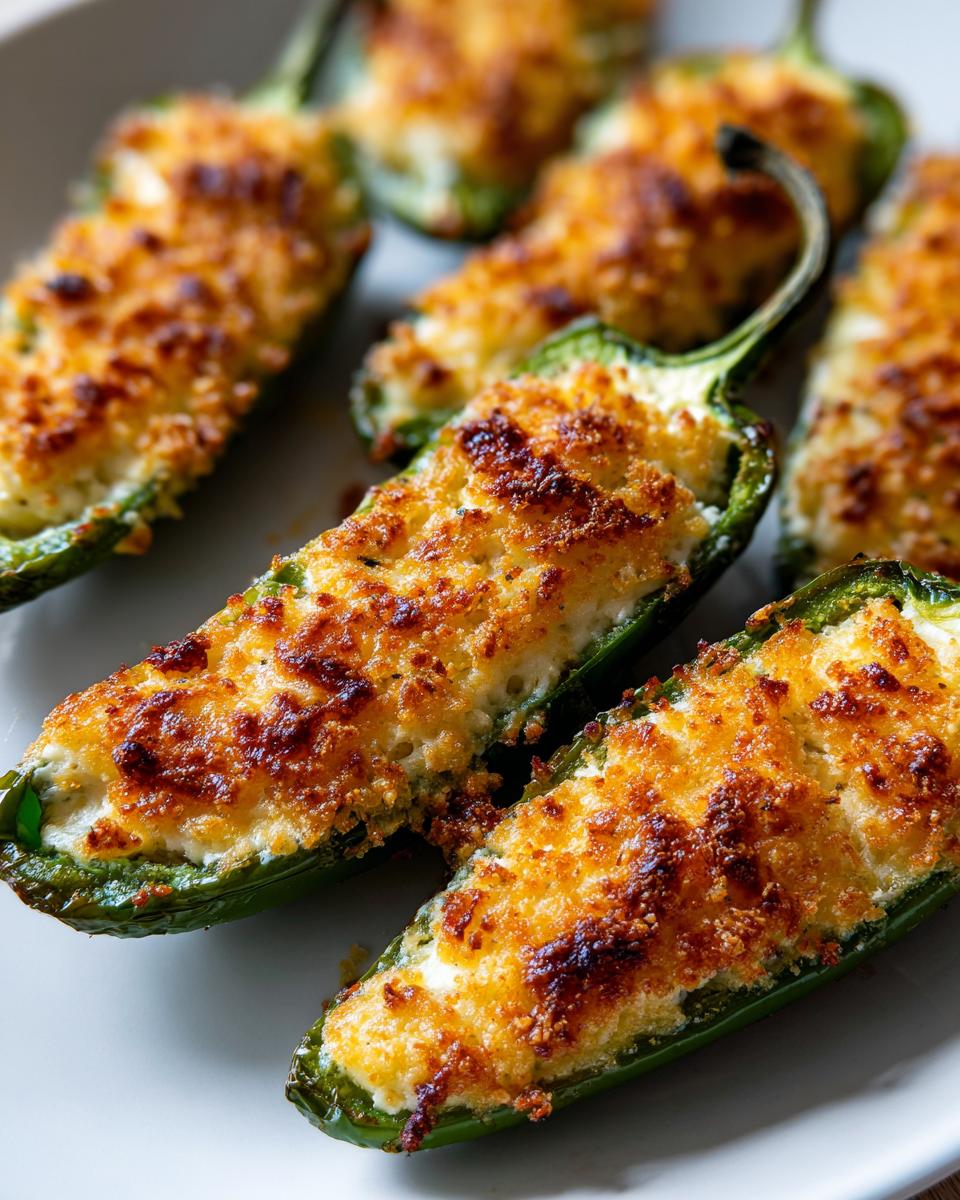
Lay them all out flat on your prepared baking sheet. They shouldn’t be touching much so they bake evenly. Pop the tray right into that 400°F oven. You’re looking for about 18 to 22 minutes. You’ll know they are done when that cheese filling is bubbly and starting to look golden, and the peppers themselves are tender when you poke them. If you wrapped them in bacon, make sure that bacon gets nice and crisp!
Pull out your incredible batch of baked jalapeño poppers and maybe let them cool for just five minutes. They will be screaming hot right out of the oven, but trust me, they are worth the short wait!
Tips for Making the Best Jalapeño Poppers Every Time
Even though this recipe is super simple, a couple of tiny tricks can take your poppers from “good” to “why aren’t these on every party menu?” I’ve tested batch after batch trying to get that perfect balance of crispy topping, gooey cheese, and tender pepper without burning anything. These little cheats really make a difference, I promise.
The most important thing you can do is trust your sense of touch when mixing the cheese filling. You want that cream cheese to be completely smooth before you introduce the cheddar. If there are still cold lumps of cream cheese when you mix it, those lumps will stay cold and firm even after the rest of the popper is perfectly hot and bubbly. Take an extra minute to really incorporate everything until it looks like one homogenous, beautiful cheesy paste.
If you went the route and wrapped yours in bacon, here’s how I guarantee that bacon gets perfectly crisp:
- Use thinner cut bacon! The thicker stuff often takes so long to crisp that the cheese starts to brown too much.
- I sometimes lay the bacon-wrapped ones directly on the wire rack set over the baking sheet for the first 10 minutes. This allows air to circulate all around that bacon, mimicking how a grill cooks things. Then, I move them back onto the parchment if the cheese topping looks like it needs protection.
- Make sure the bacon overlaps cleanly on the pepper. A loose wrap will just unroll halfway through baking, leaving you with floppy strips instead of crispy hats!
Finally, make sure those breadcrumbs get a good coating of melted butter. The fat is what helps them brown up instead of just drying out and turning hard. That slight crunch on top against the soft cheese? That’s what I love most about the baked version!
Variations on Classic Jalapeño Poppers
While this original recipe is my tried-and-true go-to, I absolutely love experimenting once you’ve mastered the basic technique! Cooking should be fun, and these little peppers are the perfect canvas for creativity. Once you know how the cheese melts and the pepper softens in the oven, you can really start mixing things up. Don’t feel like you have to stick just to the cheddar and cream cheese, either!
If you’re feeling adventurous, try mixing some fresh, finely chopped cilantro or chives right into your cheese filling. A little bit of finely minced onion or even a tiny dash of smoked paprika can add a layer of complexity that’s just divine. A small splash of hot sauce, like Cholula, into the cream cheese also wakes things up wonderfully if you need an extra kick beyond the pepper itself.
And of course, we have to talk about the bacon again! If you skipped it the first time around, I highly encourage you to try making these bacon wrapped poppers next time. Wrapping them snugly before breading adds richness and a salty crunch you just can’t replicate otherwise. But hey, sometimes you want something lighter, so feel free to just stick to the breadcrumb topping!
Cheese swapping is another easy win. If you want something tangier than cheddar, go ahead and use Gruyère—it melts like a dream! Or, for a milder flavor that really lets the pepper shine through, Monterey Jack, as I mentioned before, is perfect. The main thing is to keep that cheese ratio healthy because that creamy core is what tames the whole beautiful spice explosion. Experiment a little; your guests will thank you for the delicious changes!
Serving Suggestions for These Spicy Appetizer Poppers
So, you pulled a perfect tray of bubbly spicy appetizer poppers out of the oven. Now what? While they are seriously delicious all on their own—thanks to all that creamy cheese holding everything together—I think every great appetizer deserves a cooling counterpart for dipping. It’s the classic play: heat meets cool, and everyone is happy.
The richness of the cheese and the spice from the jalapeño really sing when paired with something tangy and cold. My absolute favorite thing to serve alongside these is a homemade ranch dip. Forget the bottled stuff; the homemade version lets you put in fresh dill and chives, which cuts through the fatty richness of the filling perfectly. I whip mine up in about five minutes, and it elevates the whole experience. Who doesn’t love a good dip, right?
If ranch isn’t your family’s go-to, sour cream and onion dip works just as beautifully. It’s classic comfort food pairing that never fails! Sometimes, if I know I’ve got a crowd that really loves intense spice, I’ll cut up some fresh avocado slices and scatter them on the serving platter. The healthy fat in the avocado does the same job as the sour cream—it cools the palate down gently between bites.
For game day spreads, I always place a small bowl of tangy homemade salsa right next to the platter, too. It adds brightness and acidity alongside the creamy center of your baked jalapeño poppers. Think of it as balancing out all that delicious richness. Honestly, these poppers are so versatile, but having a cool, creamy dip nearby is always my number one serving tip!
Storage and Reheating Instructions for Leftover Jalapeño Poppers
Now, let’s be real. It’s rare that we have leftovers of these things because everyone devours them, but if you’re lucky enough to save a few of these amazing jalapeño poppers, I’ve got the best way to keep them tasting great.
The key is keeping that creamy center happy and that crisp topping intact, which means you need to avoid the microwave if you can! Microwaving softens the breadcrumbs right away, and nobody wants soggy poppers.
For storage, you need to let them cool completely first. Trying to seal up hot food creates steam, and steam equals sogginess, which ruins the experience. Once they are totally cooled, place them in an airtight container. I prefer layering them between paper towels inside the container. That absorbs any extra moisture that might try to sneak in overnight. They should last safely in the fridge for about three or four days.
When you’re ready to enjoy them again, the oven is your best friend! Preheat the oven back up to 350 degrees Fahrenheit. Lay the poppers out on a small baking sheet—try not to let them touch if you can help it. Bake them for about 8 to 10 minutes. They’ll reheat evenly, the cheese melts back to that bubbly perfection, and if you had bacon or breadcrumbs on top, they get a second chance to crisp up nicely!
If you are completely in a rush and *must* use the microwave, I won’t tell anyone, but use caution! Heat them in short 15-second bursts, and maybe set them on a small paper towel just in case. They won’t be crispy, but they will be hot and cheesy, which is better than cold, sad poppers, right?
Frequently Asked Questions About Jalapeño Poppers
It’s totally normal to have questions when you’re tackling a recipe with a little bit of heat! Baking them instead of frying definitely changes the game, but I know people always want to confirm details about safety, timing, and that all-important spice level. Check out the most common things folks ask me about these cream cheese stuffed jalapeños!
How do I control the heat level in my jalapeño poppers?
This is the number one question, and the answer is simple: it all happens inside the pepper! You want flavor, not pain, right? The heat lives primarily in the white, stringy membrane—that pith—that attaches to the seeds inside the pepper. When you slice your peppers open, use a small spoon or a detailed knife to scrape out every single bit of that white material. While you must remove the seeds too (because they carry a lot of the oils), focusing on getting rid of that pith is the real secret to success. Remove the pith thoroughly, and you’ll have a wonderful, warm kick instead of something too spicy for the crowd.
Can I make these cream cheese stuffed jalapeños ahead of time?
Oh yes, you can absolutely do some of the prep ahead of time, which is a lifesaver when hosting! I recommend prepping them fully up until the topping stage. You can slice, clean, and stuff all those jalapeños with your cheese mixture the day before. If you are wrapping them in bacon, wrap them too! Keep the filled peppers covered tightly with plastic wrap in the fridge.
The only thing you should wait to do is sprinkle on that buttery breadcrumb topping. If you top them too early, the breadcrumbs will start to soak up moisture from the cheese filling and won’t get nearly as crispy in the oven as we want. Assemble the topping right before you slide them into that 400°F oven for baking!
Estimated Nutritional Information for Jalapeño Poppers
I am not a nutritionist, so please take these numbers with a grain of salt! I ran these quick estimates based on the recipe using half the batch size without the optional bacon, just so you have a rough idea of what you’re enjoying. It’s always good to know what’s going into your favorite game day food!
- Serving Size: 2 poppers
- Calories: About 150
- Fat: Around 13g
- Protein: About 7g
- Carbohydrates: Roughly 4g
Since we are baking these instead of submerging them in oil, the fat content is managed pretty well! If you choose to skip the breadcrumbs and go straight for serving them plain with that bubbly cheese, those numbers drop even further. If you add the bacon, of course, you’ll see those fat and calorie counts climb a bit—but oh, is it worth it!
Share Your Experience Making These Jalapeño Poppers
Well, we made it through the whole process! I hope you’re standing there with a tray of golden, bubbly, amazing jalapeño poppers cooling on the counter right now. These simple baked appetizers always remind me that the best way to feed people is often the easiest way. I truly believe that great food doesn’t need to be complicated, and these poppers prove that perfectly!
Now that you’ve tried them, I really, really want to hear what you thought! Did you stick strictly to the cheese filling, or did you sneak in some smoked paprika like I suggested? Drop a rating below so others know how much you loved them. And gosh, if you snapped a picture of your platter—maybe with some of that fantastic ranch dip on the side—please tag me online! Seeing your cooking successes is the absolute best part of running this site. Happy dipping, and I’ll see you in the next recipe!
PrintEasy Baked Jalapeño Poppers with Cream Cheese Filling

Make these simple, cheesy jalapeño poppers in the oven instead of frying. They offer a spicy kick tamed by a creamy center, perfect for any gathering.
- Prep Time: 20 min
- Cook Time: 22 min
- Total Time: 42 min
- Yield: 24 poppers 1x
- Category: Appetizer
- Method: Baking
- Cuisine: American
- Diet: Vegetarian
Ingredients
- 12 fresh jalapeño peppers
- 8 ounces cream cheese, softened
- 1 cup shredded sharp cheddar cheese
- 1 teaspoon garlic powder
- 1/2 teaspoon onion powder
- 1/4 teaspoon salt
- 1/2 cup plain breadcrumbs
- 2 tablespoons melted butter
- Optional: 12 strips bacon, halved
Instructions
- Preheat your oven to 400 degrees Fahrenheit. Line a baking sheet with parchment paper.
- Put on gloves to handle the peppers. Slice the jalapeños in half lengthwise. Use a small spoon or knife to carefully remove the seeds and white membranes. This controls the heat level.
- In a medium bowl, mix the softened cream cheese, cheddar cheese, garlic powder, onion powder, and salt until combined.
- Spoon or pipe the cheese mixture evenly into the hollowed-out jalapeño halves.
- If using bacon, wrap one half-strip of bacon around each filled pepper half and secure with a toothpick if necessary.
- In a small bowl, mix the breadcrumbs and melted butter. Sprinkle the breadcrumb mixture over the tops of the filled peppers.
- Place the stuffed peppers on the prepared baking sheet.
- Bake for 18 to 22 minutes, or until the cheese is bubbly and the peppers are tender. If you used bacon, cook until the bacon is crisp.
- Remove from the oven and let cool slightly before serving.
Notes
- Wear gloves when cutting jalapeños to protect your skin from the capsaicin oil.
- For less heat, remove all white pithy material from inside the pepper.
- You can substitute Monterey Jack for cheddar cheese in the filling.
Nutrition
- Serving Size: 2 poppers
- Calories: 150
- Sugar: 1
- Sodium: 250
- Fat: 13
- Saturated Fat: 7
- Unsaturated Fat: 6
- Trans Fat: 0
- Carbohydrates: 4
- Fiber: 1
- Protein: 7
- Cholesterol: 35