
When the temperature climbs and you need a showstopper dessert but the thought of running your oven makes you sweat, I totally get it. That’s why my mission here at Mia’s Meals has always been to simplify those classic, comforting flavors. We shouldn’t have to spend hours in the kitchen to share something special. This **ice cream pie** recipe—the Ultimate No-Bake Oreo Ice Cream Pie—is the perfect answer to those sweltering afternoons or last-minute party needs. It’s rich, it’s got that fantastic crunch, and best of all? It requires zero baking. It embodies exactly what I believe in: taking a beloved dessert and making it completely achievable for your busy family life.
- Why This Ultimate No-Bake Oreo Ice Cream Pie is Your New Favorite Easy Frozen Dessert
- Gathering Ingredients for Your Homemade Ice Cream Pie
- Step-by-Step Instructions for the Quick Ice Cream Pie
- Tips for Making the Best Ice Cream Pie Variations
- Storage and Make Ahead Dessert Tips for Your Ice Cream Pie
- Serving Suggestions for This Festive Frozen Treats Ice Cream Pie
- Frequently Asked Questions About Making an Ice Cream Pie
- Estimated Nutritional Data for Your Ice Cream Pie
- Share Your Ultimate No-Bake Ice Cream Pie Creations
Why This Ultimate No-Bake Oreo Ice Cream Pie is Your New Favorite Easy Frozen Dessert
When you see a gorgeous, towering dessert, you probably assume it took all day, right? Not with this pie! I designed this recipe specifically because I needed something that looked fancy but actually came together while the kids were yelling about snack time. Trust me, this is the ultimate delicious dessert recipe that delivers amazing flavor payoff without any oven drama.
- It gives you that classic, decadent frozen experience without a single drop of sweat.
- It’s incredibly versatile—you can easily switch up the ice cream flavors!
- It stands up wonderfully when you need a dependable Easy Frozen Dessert for a crowd.
It’s the perfect go-to when you need a truly amazing Quick Ice Cream Pie that feels celebratory.
Quick Prep Time for Your Ice Cream Pie Recipe
Honestly, the hardest part of this whole thing is waiting for the ice cream to soften slightly! The active work time is only about 20 minutes, tops. Before you even have your coffee brewed, the crust is pressed and chilling. It’s so much faster than waiting for cake layers to bake and cool down. That’s why I call it my emergency party fix!
The Magic of a No Bake Ice Cream Pie
The best part, hands down, is not having to turn the oven on in the middle of July. Skipping the bake time automatically makes this a fantastic summer dessert. Since it all comes together cold and goes straight into the freezer, your kitchen stays cool, and you get a sturdy, clean-slicing No Bake Ice Cream Pie every single time. It’s pure genius!
Gathering Ingredients for Your Homemade Ice Cream Pie
Okay, let’s talk about what you need to make this magic happen. Because this is a no-bake recipe, the quality and texture of your starting ingredients are super important for a successful Homemade Ice Cream Pie. Have everything measured out before you start pressing that crust, because once you start mixing, things move fast! Don’t worry if you’ve never made one before; if you follow these measurements precisely, you’ll end up with the best frozen treat you’ve ever had.
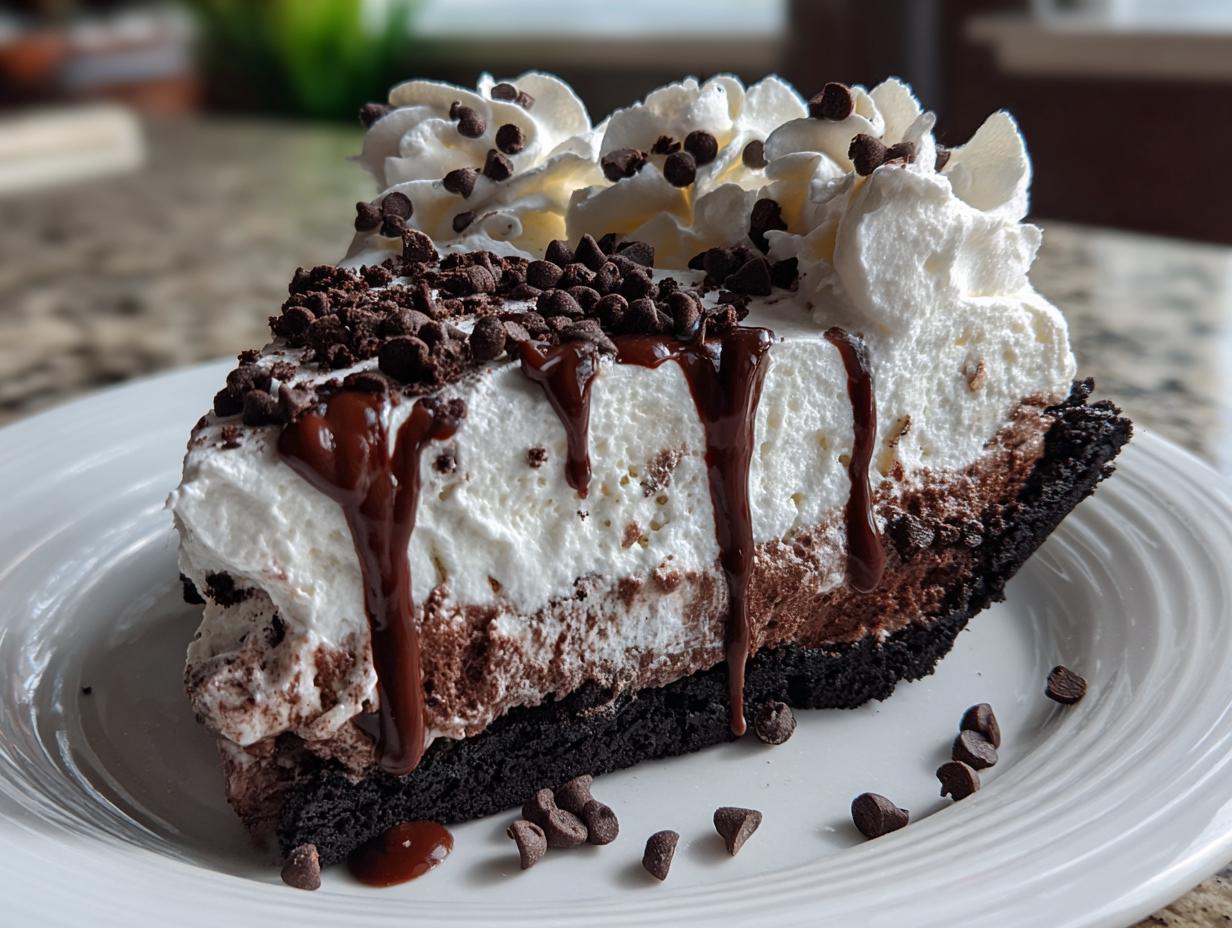
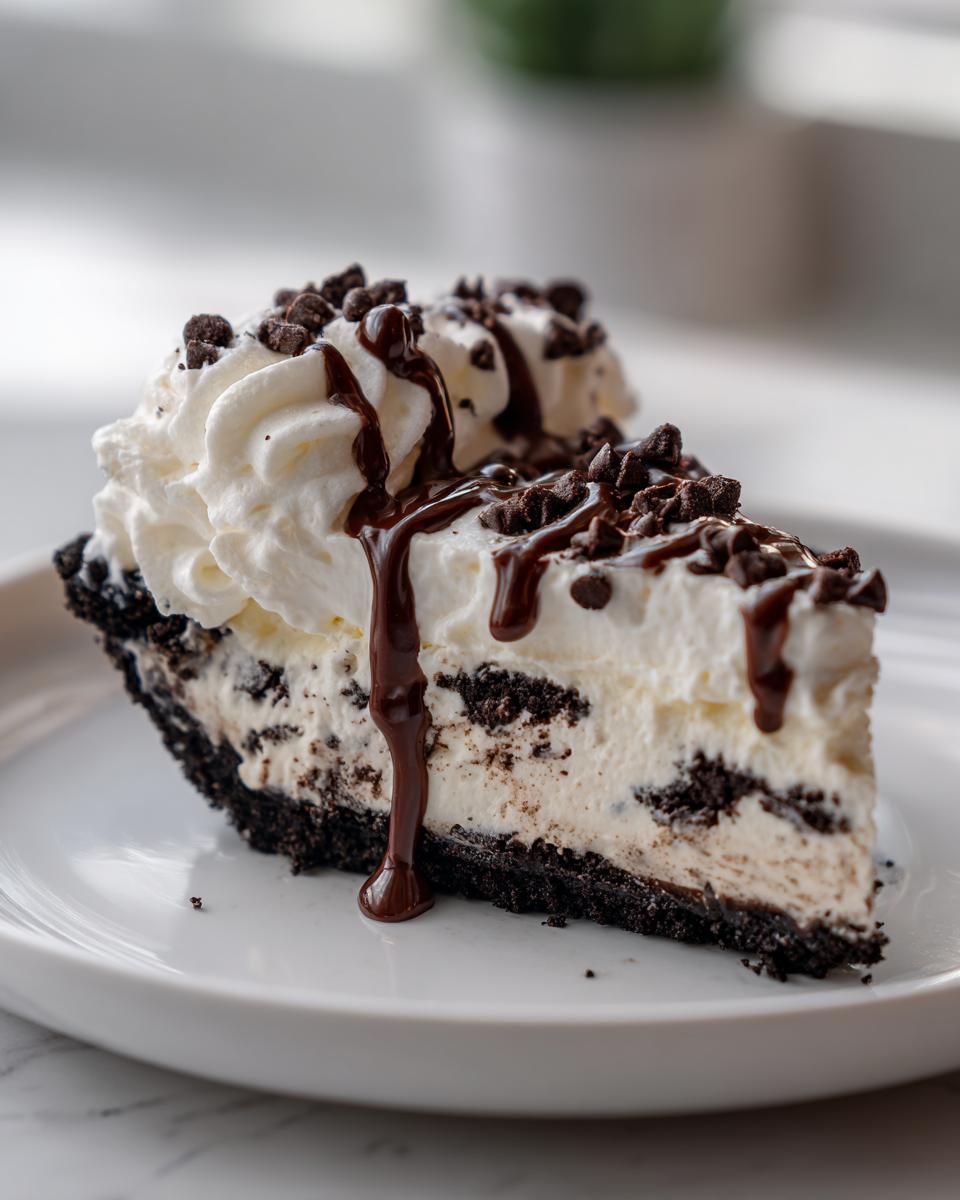
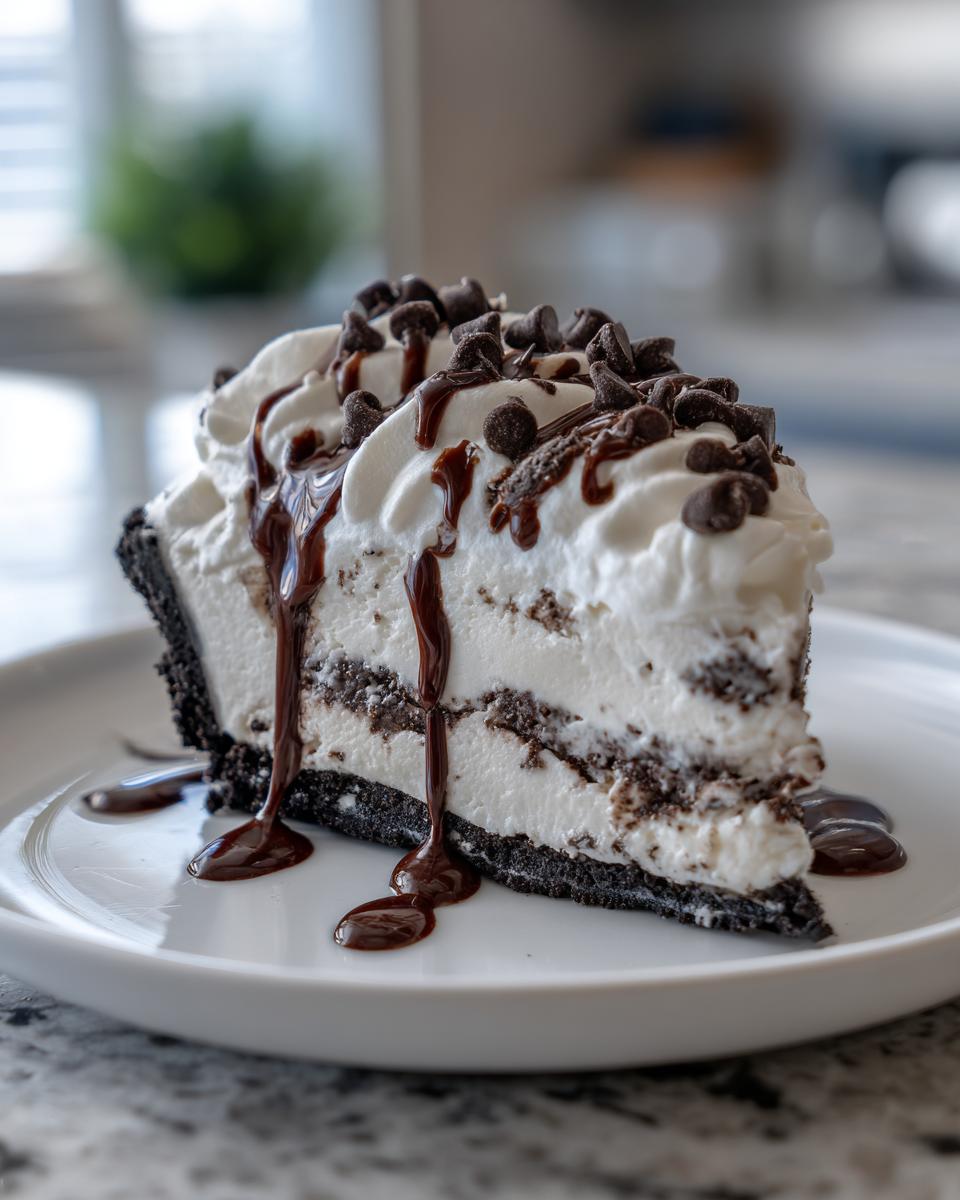
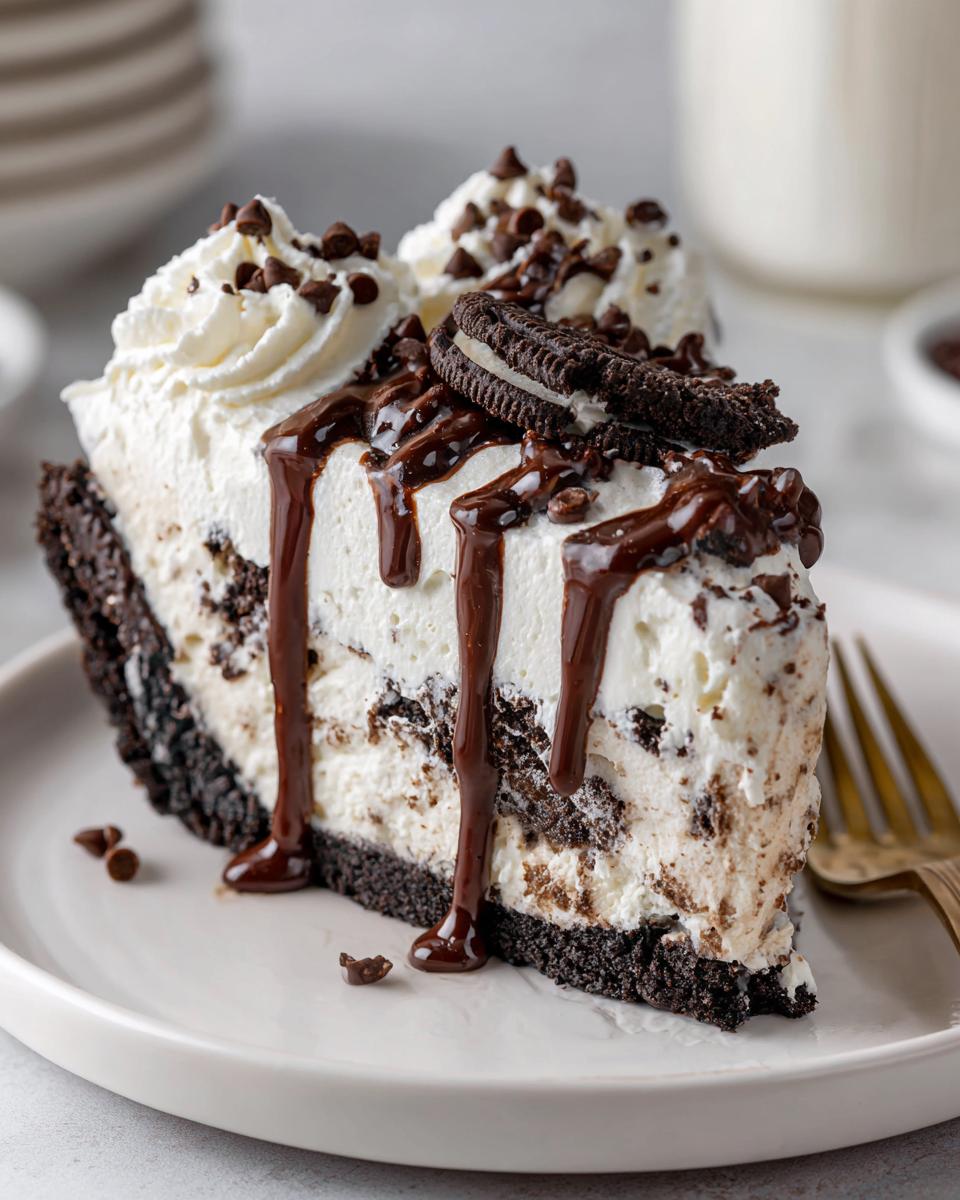
Crust and Filling Components for the Oreo Ice Cream Pie
This is the foundation of our dessert! For the crust, you need those iconic sandwich cookies—don’t skimp on the cream filling, that’s what binds it all together. And for the filling, remember to take your ice cream out about ten minutes before you plan to spread it. It needs to be soft enough to scoop nicely, but not totally melted!
- 1 3/4 cups crushed Oreo cookies (about 25 cookies)
- 1/2 cup unsalted butter, melted
- 1/2 gallon vanilla ice cream, softened
- 1/2 cup hot fudge topping
Whipped Topping and Garnish for the Best Ice Cream Pie
The topping is what really takes this pie over the top, turning it into a stunning Best Ice Cream Pie. We’re making a simple, stable whipped cream, so make sure your heavy whipping cream is nice and cold. This is crucial for stiff peaks!
- 1 cup heavy whipping cream
- 2 tablespoons powdered sugar
- 1/2 teaspoon vanilla extract
- 1/2 cup mini chocolate chips or chopped Oreos for garnish
Step-by-Step Instructions for the Quick Ice Cream Pie
Now for the fun, mess-free part! This is where your patience pays off. Because we aren’t baking, success hinges on good timing—especially getting those freezer breaks just right. If you follow these sequential steps, I promise you’ll feel like a dessert hero. It’s straightforward, but you need to respect the chill time. Think of the freezer as your oven; we have to let it work its magic for a wonderful easy nobake chocolate eclair cake recipe.
- Combine the crushed Oreo cookies and melted butter in a bowl. Press the mixture firmly into the bottom and up the sides of a 9-inch pie plate. Freeze the crust for 15 minutes.
- Spread the softened vanilla ice cream evenly over the chilled crust. Return the pie to the freezer for at least 2 hours, or until firm.
- Prepare the whipped topping: Beat the heavy whipping cream, powdered sugar, and vanilla extract in a medium bowl until stiff peaks form.
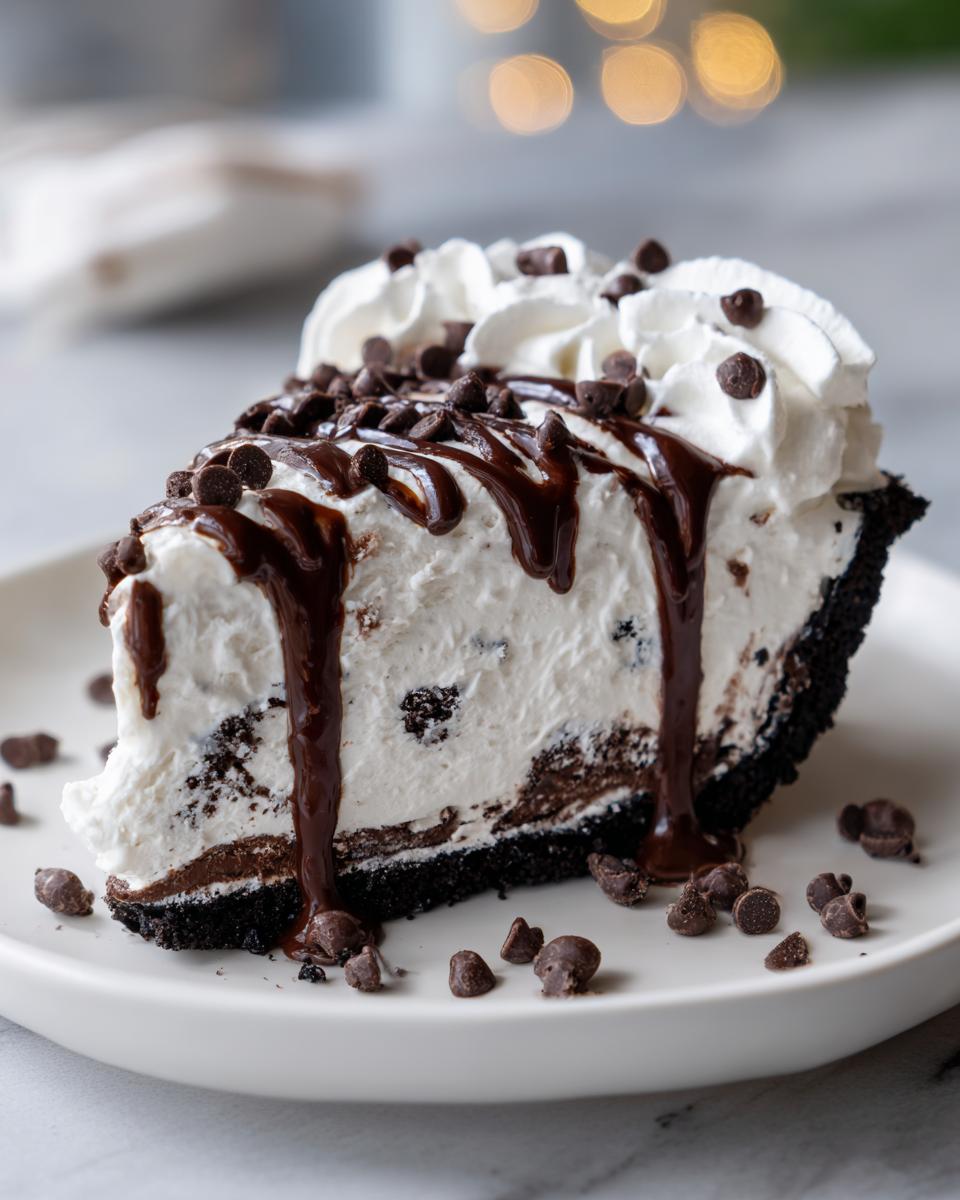
- Spread the whipped topping over the frozen ice cream layer. Drizzle the hot fudge topping over the whipped cream.
- Sprinkle the top with mini chocolate chips or chopped Oreos.
- Freeze the pie for at least 4 hours, or until completely firm, before slicing and serving.
Preparing the Oreo Crust for Your No Bake Ice Cream Pie
For Step 1, make sure that crust mixture is pressed down tightly! Use the bottom of a dry measuring cup to really pack that buttery Oreo base against the bottom *and* up the sides of the pie plate. A crumbly edge ruins the experience later! Once it’s packed tight, we pop it into the freezer for 15 minutes. This initial chill is what sets the cookie structure so that our No Bake Ice Cream Pie doesn’t collapse when we add the heavy fillings.
Layering the Ice Cream and Setting the Ice Cream Pie
This is where the main body of your ice cream pie comes to life. Take your softened vanilla ice cream—and I really mean soft, scoopable, but not melted soup—and spread it over that chilled crust. Smooth out the top! Then, back into the deep freeze it goes for a minimum of 2 hours. You need it firm enough to support the whipped topping without everything sinking into a delicious, messy puddle.
Finishing Touches: Whipped Cream and Toppings on Your Ice Cream Pie
When it comes to the whipped topping (Step 3), chill your mixing bowl and beaters beforehand! It helps the heavy whipping cream whip up so much faster into those beautiful stiff peaks. After you’ve layered the topping and drizzled on that decadent hot fudge and garnish, you hit the final freeze. Don’t cheat here! We need at least 4 hours for this final set, but honestly, I usually leave it overnight. This ensures you get that beautiful, clean slice every time you serve this fantastic frozen pie recipe.
Tips for Making the Best Ice Cream Pie Variations
Once you master the basic structure of this Oreo ice cream pie, the sky is the limit! That sturdy crust and the vanilla base are just waiting for you to get creative. This is where we turn a great dessert into your signature showstopper, perfect for any season, not just summer.
Customizing Your Ice Cream Pie Flavor Profile
If your family loves chocolate, don’t even hesitate—swap out that vanilla ice cream for your favorite chocolate flavor! Or, if you need to tackle that Reese’s craving, you can easily turn this into a spectacular Peanut Butter Ice Cream Pie. Just take that softened vanilla ice cream and swirl in about 1/2 cup of creamy or crunchy peanut butter until you have pretty ribbons. For my mint lovers, try making a layered Mint Chocolate Ice Cream Pie by alternating layers of chocolate ice cream and mint chip ice cream before you top it all off. See? It’s so easy to adapt this ice cream pie standard!
Expert Tip: Achieving Perfect Whipped Topping Consistency
I mentioned chilling your bowl earlier, but let me give you the full rundown because fluffy topping is non-negotiable! For the absolute stiffest peaks, put your mixing bowl and your whisk attachment (if you use a stand mixer) into the freezer for a solid 15 minutes before you start whipping the heavy cream. Cold fat whips up faster and stays stiffer forever! If you notice it starting to look grainy or lose its body while beating, just pop the bowl back in the freezer for five minutes to shock it back into shape. This small step guarantees your topping looks gorgeous right up until the moment you slice into that frozen delight.
Storage and Make Ahead Dessert Tips for Your Ice Cream Pie
One of the main reasons I love this Make Ahead Dessert so much for my busy schedule is that it actually gets better after a good, long freeze. You can totally prepare this masterpiece ahead of time! If you’re planning for a big event or just want to have an emergency frozen treat ready, wrap that pie up tightly—plastic wrap directly on the surface, then a layer of foil—and stash it in the deepest, coldest part of your freezer. It keeps beautifully for up to two weeks. That means one less thing to worry about when you’re prepping for Dessert for Parties!
Now, slicing can be tricky with any frozen pie, but I have a trick that ensures a beautiful first slice without smashing the crust. Take the pie out of the freezer about 10 minutes before you plan to serve it. This lets it thaw just slightly on the edges. Run a sharp, thin knife under very hot water, wipe it dry quickly, and then slice. The heat helps the knife glide right through the ice cream and the fudgy layers. Wipe the knife clean between every slice, re-heat it under hot water, and you’ll get perfect wedges every time!
Serving Suggestions for This Festive Frozen Treats Ice Cream Pie
Since this ice cream pie is already so rich with chocolate and cream, you don’t want to weigh it down too much with the presentation. I love keeping the finish simple, but if you’re serving this for a big celebration, think opposites! A tiny drizzle of bright raspberry sauce cuts through the richness perfectly and adds that stunning color pop against the white cream. Honestly though, a strong, dark cup of coffee served alongside is my favorite textural contrast. It’s so satisfying to dip a forkful of that frozen, crunchy bite right into a warm cup of java!
Frequently Asked Questions About Making an Ice Cream Pie
I know when you’re trying out a new easy breakfast ideas, or in this case, a dessert, you always have a few things that pop into your head. That’s natural! I’ve put together some of the questions I hear most often about making the perfect Frozen Pie Recipe at home.
Can I use a different cookie for the crust in this ice cream pie?
Absolutely! While Oreos are my go-to because they provide such a great chocolatey base for the vanilla ice cream, you can definitely switch it up to make a slightly different Homemade Ice Cream Pie. If you switch to something drier, like graham crackers or vanilla wafers, you might need just a tiny bit more melted butter—maybe one or two extra tablespoons—just to make sure it holds together when you press it into the pan. Keep an eye on the texture; you want damp sand, not dust!
How long does this No Bake Ice Cream Pie need to freeze before serving?
This is where people sometimes rush it, and then they end up with soup instead of a slice! Remember, we skip baking, so the freezer does all the heavy lifting here. You need that initial 15 minutes for the crust, then at least 2 hours to set the ice cream layer. But for the absolute best-looking slice—the kind you see in magazines—I really recommend letting the whole thing firm up for a full 4 to 6 hours total. That guarantees a super clean cut through all those layers of chocolate and cream. It’s worth the wait!
Is this recipe similar to the Pioneer Woman Ice Cream Pie?
Oh, I get asked about Ree Drummond’s recipes all the time! Her desserts are always so comforting and robust. While I haven’t made her specific version, the philosophy is the same: big flavor, lots of creaminess, and a hearty crust! My Ultimate No-Bake Oreo Ice Cream Pie is designed to be the absolute quickest route to that satisfying frozen experience. We focus on just a few high-impact layers—the Oreo crust, vanilla ice cream, and a simple fudge drizzle—to make sure you get that incredible ice cream pie flavor without needing a dozen different components.
Estimated Nutritional Data for Your Ice Cream Pie
I get it—when you’re making a showstopper like this ice cream pie for a party, you sometimes wonder what you’re serving up! Since this is a simple, decadent treat, I always want to be upfront about what’s in it compared to other, more complicated frozen desserts. Remember, because we’re using full-fat dairy and plenty of those delicious Oreos, the numbers look hearty. That’s fine! We’re meant to enjoy treats like this sometimes, right?
Here is a general breakdown based on the recipe as written. If you decided to use a lower-fat ice cream or trade out the butter for a substitute, these numbers will change, of course. I always recommend checking the specific packaging for the most accurate count for your version of this easy frozen dessert.
- Serving Size: 1 slice
- Calories: 450
- Sugar: 45g
- Sodium: 250mg
- Fat: 28g
- Saturated Fat: 16g
- Unsaturated Fat: 12g
- Trans Fat: 0.5g
- Carbohydrates: 48g
- Fiber: 1g
- Protein: 5g
- Cholesterol: 55mg
Just a quick note: these figures are estimates for one serving size based on the provided ingredient list. This isn’t meant to be a low-calorie recipe; it’s meant to be the *best* and most satisfying ice cream pie there is! Enjoy the richness!
Share Your Ultimate No-Bake Ice Cream Pie Creations
Well, we made it! You’ve got the crust, the creamy filling, and the perfect chocolate topping on your very own Ultimate No-Bake Oreo Ice Cream Pie. Seriously, isn’t it amazing how simple that was? My heart melts a little bit knowing a totally homemade, show-stopping ice cream pie came together without even having to preheat the oven.
Now for the fun part! I absolutely *live* to see what you all create in your kitchens. When you bring this out after dinner, snap a picture! Tag me on social media! Knowing that this simple recipe is helping you create those connected, happy moments around your table is why I do all this work.
If you loved this recipe and found it to be the fastest, tastiest quick ice cream pie you’ve ever made, please leave us a 5-star rating right below. It helps other busy families find these simple, delicious solutions! And don’t stop here; check out my easy homemade soft chewy caramels recipe next for another foolproof make-ahead treat!
PrintUltimate No-Bake Oreo Ice Cream Pie

Make this easy frozen dessert with a simple Oreo crust and creamy filling. It requires no baking and is perfect for summer gatherings or quick family treats.
- Prep Time: 20 min
- Cook Time: 0 min
- Total Time: 4 hr 20 min
- Yield: 8 servings 1x
- Category: Dessert
- Method: No Bake
- Cuisine: American
- Diet: Vegetarian
Ingredients
- 1 3/4 cups crushed Oreo cookies (about 25 cookies)
- 1/2 cup unsalted butter, melted
- 1/2 gallon vanilla ice cream, softened
- 1/2 cup hot fudge topping
- 1 cup heavy whipping cream
- 2 tablespoons powdered sugar
- 1/2 teaspoon vanilla extract
- 1/2 cup mini chocolate chips or chopped Oreos for garnish
Instructions
- Combine the crushed Oreo cookies and melted butter in a bowl. Press the mixture firmly into the bottom and up the sides of a 9-inch pie plate. Freeze the crust for 15 minutes.
- Spread the softened vanilla ice cream evenly over the chilled crust. Return the pie to the freezer for at least 2 hours, or until firm.
- Prepare the whipped topping: Beat the heavy whipping cream, powdered sugar, and vanilla extract in a medium bowl until stiff peaks form.
- Spread the whipped topping over the frozen ice cream layer. Drizzle the hot fudge topping over the whipped cream.
- Sprinkle the top with mini chocolate chips or chopped Oreos.
- Freeze the pie for at least 4 hours, or until completely firm, before slicing and serving.
Notes
- For a richer chocolate flavor, use chocolate ice cream instead of vanilla, or swirl in 1/2 cup of chocolate fudge into the softened vanilla ice cream before spreading it into the crust.
- If you want a Reese’s Peanut Butter Ice Cream Pie, layer a thin layer of peanut butter between the ice cream and the whipped topping.
- You can make this dessert ahead of time; it keeps well in the freezer for up to two weeks.
Nutrition
- Serving Size: 1 slice
- Calories: 450
- Sugar: 45g
- Sodium: 250mg
- Fat: 28g
- Saturated Fat: 16g
- Unsaturated Fat: 12g
- Trans Fat: 0.5g
- Carbohydrates: 48g
- Fiber: 1g
- Protein: 5g
- Cholesterol: 55mg